
マクロ
日本語を消す 英語を消す下記URLから引用し、日本語訳をつけてみました。
https://docs.swift.org/swift-book/documentation/the-swift-programming-language/macros
Use macros to generate code at compile time.
マクロを使用してコンパイル時にコードを生成します。
Macros transform your source code when you compile it, letting you avoid writing repetitive code by hand. During compilation, Swift expands any macros in your code before building your code as usual.
マクロを使用すると、コンパイル時にソース コードが変換されるため、手動で繰り返しコードを作成する必要がなくなります。 コンパイル中、Swift は通常どおりコードをビルドする前に、コード内のマクロを展開します。
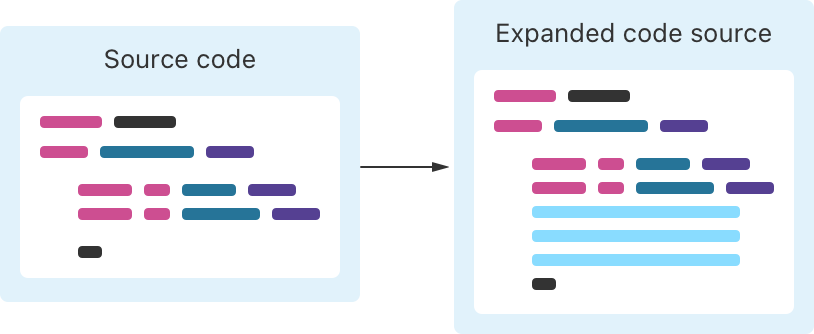
Expanding a macro is always an additive operation: Macros add new code, but they never delete or modify existing code.
マクロの展開は常に追加操作です。マクロは新しいコードを追加しますが、既存のコードを削除したり変更したりすることはありません。
Both the input to a macro and the output of macro expansion are checked to ensure they’re syntactically valid Swift code. Likewise, the values you pass to a macro and the values in code generated by a macro are checked to ensure they have the correct types. In addition, if the macro’s implementation encounters an error when expanding that macro, the compiler treats this as a compilation error. These guarantees make it easier to reason about code that uses macros, and they make it easier to identify issues like using a macro incorrectly or a macro implementation that has a bug.
マクロへの入力とマクロ展開の出力の両方がチェックされ、構文的に有効な Swift コードであることが確認されます。 同様に、マクロに渡す値とマクロによって生成されたコード内の値がチェックされ、正しい型であることが確認されます。 さらに、マクロの展開時にマクロの実装でエラーが発生した場合、コンパイラはこれをコンパイル エラーとして扱います。 これらの保証により、マクロを使用するコードについての推論が容易になり、マクロの誤った使用やバグのあるマクロ実装などの問題を特定しやすくなります。
Swift has two kinds of macros:
Swift には 2 種類のマクロがあります。
- Freestanding macros appear on their own, without being attached to a declaration.
- 独立したマクロは、宣言に添付されずに単独で表示されます。
- Attached macros modify the declaration that they’re attached to.
- 添付されたマクロは、添付されている宣言を変更します。
You call attached and freestanding macros slightly differently, but they both follow the same model for macro expansion, and you implement them both using the same approach. The following sections describe both kinds of macros in more detail.
アタッチされたマクロと独立したマクロの呼び出し方法は少し異なりますが、どちらもマクロ拡張の同じモデルに従い、同じアプローチを使用して実装します。 次のセクションでは、両方の種類のマクロについて詳しく説明します。
Freestanding Macros
自立型マクロ
To call a freestanding macro, you write a number sign (#) before its name, and you write any arguments to the macro in parentheses after its name. For example:
独立したマクロを呼び出すには、その名前の前に番号記号 (#) を書き、そのマクロの引数をその名前の後にかっこ内に書きます。 例えば:
func myFunction() {
    print("Currently running \(#function)")
    #warning("Something's wrong")
}
In the first line, #function calls the function()(Link:developer.apple.com) macro from the Swift standard library. When you compile this code, Swift calls that macro’s implementation, which replaces #function with the name of the current function. When you run this code and call myFunction(), it prints “Currently running myFunction()”. In the second line, #warning calls the warning(_:)(Link:developer.apple.com) macro from the Swift standard library to produce a custom compile-time warning.
最初の行では、#function が Swift 標準ライブラリから function()(Link:developer.apple.com)(英語) マクロを呼び出します。 このコードをコンパイルすると、Swift はそのマクロの実装を呼び出し、#function を現在の関数の名前に置き換えます。 このコードを実行して myFunction() を呼び出すと、「Currently running myFunction()」と表示されます。 2 行目の #warning は、Swift 標準ライブラリから warning(_:) (Link:developer.apple.com)(英語)マクロを呼び出して、カスタムのコンパイル時警告を生成します。
Freestanding macros can produce a value, like #function does, or they can perform an action at compile time, like #warning does.
独立したマクロは、#function のように値を生成したり、#warning のようにコンパイル時にアクションを実行したりできます。
Attached Macros
添付されたマクロ
To call an attached macro, you write an at sign (@) before its name, and you write any arguments to the macro in parentheses after its name.
添付されたマクロを呼び出すには、その名前の前にアットマーク (@) を書き、そのマクロの引数をその名前の後ろのかっこ内に書きます。
Attached macros modify the declaration that they’re attached to. They add code to that declaration, like defining a new method or adding conformance to a protocol.
添付されたマクロは、添付されている宣言を変更します。 新しいメソッドの定義やプロトコルへの準拠の追加など、その宣言にコードを追加します。
For example, consider the following code that doesn’t use macros:
たとえば、マクロを使用しない次のコードを考えてみましょう。
struct SundaeToppings: OptionSet {
    let rawValue: Int
    static let nuts = SundaeToppings(rawValue: 1 << 0)
    static let cherry = SundaeToppings(rawValue: 1 << 1)
    static let fudge = SundaeToppings(rawValue: 1 << 2)
}
In this code, each of the options in the SundaeToppings option set includes a call to the initializer, which is repetitive and manual. It would be easy to make a mistake when adding a new option, like typing the wrong number at the end of the line.
このコードでは、SundaeToppings オプション セットの各オプションにイニシャライザの呼び出しが含まれており、これは反復的かつ手動です。 新しいオプションを追加するときは、行末に間違った数字を入力するなど、間違いを犯しやすくなります。
Here’s a version of this code that uses a macro instead:
代わりにマクロを使用するこのコードのバージョンを次に示します。
@OptionSet<Int>
struct SundaeToppings {
    private enum Options: Int {
        case nuts
        case cherry
        case fudge
    }
}
This version of SundaeToppings calls an @OptionSet macro. The macro reads the list of cases in the private enumeration, generates the list of constants for each option, and adds a conformance to the OptionSet(Link:developer.apple.com) protocol.
このバージョンの SundaeToppings は、@OptionSet マクロを呼び出します。 このマクロは、プライベート列挙内のケースのリストを読み取り、各オプションの定数のリストを生成し、OptionSet (Link:developer.apple.com)(英語)プロトコルに準拠を追加します。
For comparison, here’s what the expanded version of the @OptionSet macro looks like. You don’t write this code, and you would see it only if you specifically asked Swift to show the macro’s expansion.
比較のために、@OptionSet マクロの展開バージョンは次のようになります。 このコードはユーザーが作成したものではなく、マクロの展開を表示するように Swift に具体的に要求した場合にのみ表示されます。
struct SundaeToppings {
    private enum Options: Int {
        case nuts
        case cherry
        case fudge
    }


    typealias RawValue = Int
    var rawValue: RawValue
    init() { self.rawValue = 0 }
    init(rawValue: RawValue) { self.rawValue = rawValue }
    static let nuts: Self = Self(rawValue: 1 << Options.nuts.rawValue)
    static let cherry: Self = Self(rawValue: 1 << Options.cherry.rawValue)
    static let fudge: Self = Self(rawValue: 1 << Options.fudge.rawValue)
}
extension SundaeToppings: OptionSet { }
All of the code after the private enumeration comes from the @OptionSet macro. The version of SundaeToppings that uses a macro to generate all of the static variables is easier to read and easier to maintain than the manually coded version, earlier.
プライベート列挙後のすべてのコードは、@OptionSet マクロから取得されます。 マクロを使用してすべての静的変数を生成する SundaeToppings のバージョンは、以前の手動でコード化されたバージョンよりも読みやすく、保守も容易です。
Macro Declarations
マクロ宣言
In most Swift code, when you implement a symbol, like a function or type, there’s no separate declaration. However, for macros, the declaration and implementation are separate. A macro’s declaration contains its name, the parameters it takes, where it can be used, and what kind of code it generates. A macro’s implementation contains the code that expands the macro by generating Swift code.
ほとんどの Swift コードでは、関数や型などのシンボルを実装するときに、別個の宣言はありません。 ただし、マクロの場合、宣言と実装は別になります。 マクロの宣言には、マクロの名前、マクロが受け取るパラメータ、使用できる場所、生成されるコードの種類が含まれます。 マクロの実装には、Swift コードを生成してマクロを展開するコードが含まれています。
You introduce a macro declaration with the macro keyword. For example, here’s part of the declaration for the @OptionSet macro used in the previous example:
macroキーワードを使用してマクロ宣言を導入します。 たとえば、前の例で使用した @OptionSet マクロの宣言の一部を次に示します。
public macro OptionSet<RawType>() =
        #externalMacro(module: "SwiftMacros", type: "OptionSetMacro")
The first line specifies the macro’s name and its arguments — the name is OptionSet, and it doesn’t take any arguments. The second line uses the externalMacro(module:type:)(Link:developer.apple.com)(英語) macro from the Swift standard library to tell Swift where the macro’s implementation is located. In this case, the SwiftMacros module contains a type named OptionSetMacro, which implements the @OptionSet macro.
最初の行はマクロの名前とその引数を指定します。名前は OptionSet で、引数は取りません。 2 行目は、Swift 標準ライブラリの externalMacro(module:type:)(Link:developer.apple.com)(英語) マクロを使用して、マクロの実装の場所を Swift に伝えます。 この場合、SwiftMacros モジュールには、@OptionSet マクロを実装する OptionSetMacro という名前のタイプが含まれています。
Because OptionSet is an attached macro, its name uses upper camel case, like the names for structures and classes. Freestanding macros have lower camel case names, like the names for variables and functions.
OptionSet は添付マクロであるため、その名前には構造体やクラスの名前と同様に大文字のキャメルケースが使用されます。 独立したマクロには、変数や関数の名前と同様に、小文字のキャメルケース名が付けられます。
Note
注釈
Macros are always declared as public. Because the code that declares a macro is in a different module from code that uses that macro, there isn’t anywhere you could apply a nonpublic macro.
マクロは常に public として宣言されます。 マクロを宣言するコードは、そのマクロを使用するコードとは別のモジュールにあるため、非公開マクロを適用できる場所はどこにもありません。
A macro declaration defines the macro’s roles — the places in source code where that macro can be called, and the kinds of code the macro can generate. Every macro has one or more roles, which you write as part of the attributes at the beginning of the macro declaration. Here’s a bit more of the declaration for @OptionSet, including the attributes for its roles:
マクロ宣言は、マクロの役割、つまりそのマクロを呼び出すことができるソース コード内の場所、およびマクロが生成できるコードの種類を定義します。 すべてのマクロには 1 つ以上の役割があり、マクロ宣言の先頭に属性の一部として記述します。 ここでは、@OptionSet の宣言をもう少し詳しく説明します。これには、そのロールの属性も含まれます。
@attached(member)
@attached(extension, conformances: OptionSet)
public macro OptionSet<RawType>() =
        #externalMacro(module: "SwiftMacros", type: "OptionSetMacro")
The @attached attribute appears twice in this declaration, once for each macro role. The first use, @attached(member), indicates that the macro adds new members to the type you apply it to. The @OptionSet macro adds an init(rawValue:) initializer that’s required by the OptionSet protocol, as well as some additional members. The second use, @attached(extension, conformances: OptionSet), tells you that @OptionSet adds conformance to the OptionSet protocol. The @OptionSet macro extends the type that you apply the macro to, to add conformance to the OptionSet protocol.
@attached 属性は、この宣言内で 2 回、マクロの役割ごとに 1 回ずつ表示されます。 最初の使用 @attached(member) は、マクロが適用先の型に新しいメンバーを追加することを示します。 @OptionSet マクロは、OptionSet プロトコルで必要な init(rawValue:) イニシャライザといくつかの追加メンバーを追加します。 2 番目の使用である @attached(extension, conformances: OptionSet) は、@OptionSet が OptionSet プロトコルに準拠を追加することを示します。 @OptionSet マクロは、マクロを適用する型を拡張して、OptionSet プロトコルへの準拠を追加します。
For a freestanding macro, you write the @freestanding attribute to specify its role:
独立したマクロの場合は、@freestanding 属性を記述してその役割を指定します。
@freestanding(expression)
public macro line<T: ExpressibleByIntegerLiteral>() -> T =
        /* ... location of the macro implementation... */
The #line macro above has the expression role. An expression macro produces a value, or performs a compile-time action like generating a warning.
上記の #line マクロにはexpression の役割があります。 式マクロは値を生成するか、警告の生成などのコンパイル時のアクションを実行します。
In addition to the macro’s role, a macro’s declaration provides information about the names of the symbols that the macro generates. When a macro declaration provides a list of names, it’s guaranteed to produce only declarations that use those names, which helps you understand and debug the generated code. Here’s the full declaration of @OptionSet:
マクロの役割に加えて、マクロの宣言は、マクロが生成するシンボルの名前に関する情報を提供します。 マクロ宣言で名前のリストが提供されている場合、それらの名前を使用する宣言のみが生成されることが保証されているため、生成されたコードの理解とデバッグに役立ちます。 @OptionSet の完全な宣言は次のとおりです。
@attached(member, names: named(RawValue), named(rawValue),
        named(`init`), arbitrary)
@attached(extension, conformances: OptionSet)
public macro OptionSet<RawType>() =
        #externalMacro(module: "SwiftMacros", type: "OptionSetMacro")
In the declaration above, the @attached(member) macro includes arguments after the named: label for each of the symbols that the @OptionSet macro generates. The macro adds declarations for symbols named RawValue, rawValue, and init — because those names are known ahead of time, the macro declaration lists them explicitly.
上記の宣言では、@attached(member) マクロには、@OptionSet マクロが生成する各シンボルのnamed: ラベルの後に引数が含まれています。 マクロは、RawValue、rawValue、および init という名前のシンボルの宣言を追加します。これらの名前は事前にわかっているため、マクロ宣言で明示的にリストされます。
The macro declaration also includes arbitrary after the list of names, allowing the macro to generate declarations whose names aren’t known until you use the macro. For example, when the @OptionSet macro is applied to the SundaeToppings above, it generates type properties that correspond to the enumeration cases, nuts, cherry, and fudge.
マクロ宣言には、名前のリストの後にarbitrary も含まれており、マクロを使用するまで名前が分からない宣言をマクロで生成できるようになります。 たとえば、@OptionSet マクロが上記の SundaeToppings に適用されると、列挙ケース、nuts、cherry、fudgeに対応するタイプ プロパティが生成されます。
For more information, including a full list of macro roles, see attached and freestanding in Attributes.
マクロの役割の完全なリストを含む詳細については、「属性」の「添付」および「自立型」を参照してください。
Macro Expansion
マクロ展開
When building Swift code that uses macros, the compiler calls the macros’ implementation to expand them.
マクロを使用する Swift コードをビルドする場合、コンパイラーはマクロの実装を呼び出してマクロを展開します。
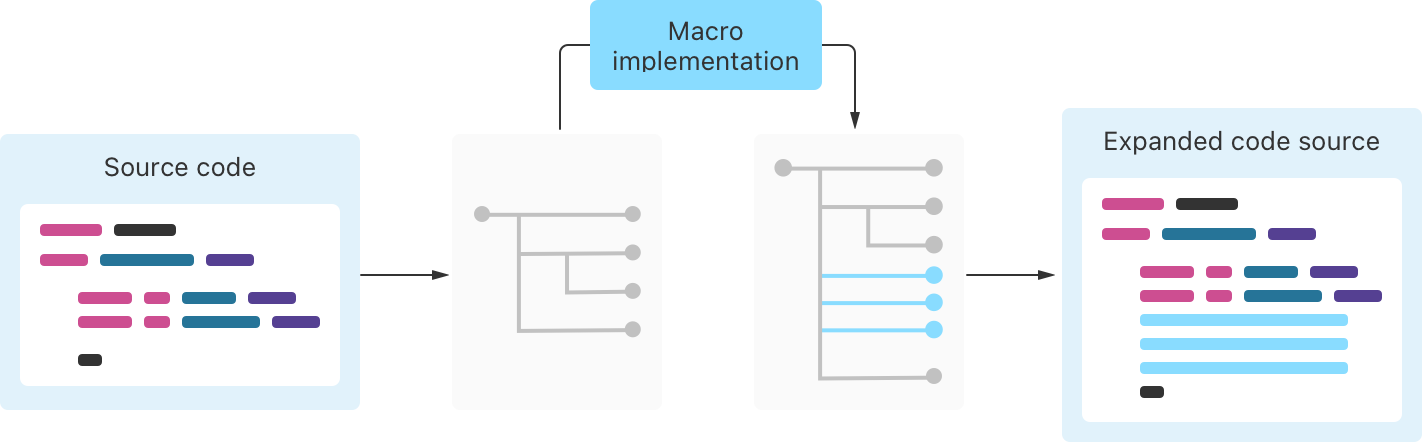
Specifically, Swift expands macros in the following way:
具体的には、Swift は次の方法でマクロを展開します。
- 1.The compiler reads the code, creating an in-memory representation of the syntax.
- 1.コンパイラはコードを読み取り、構文のメモリ内表現を作成します。
- 2.The compiler sends part of the in-memory representation to the macro implementation, which expands the macro.
- 2.コンパイラはメモリ内表現の一部をマクロ実装に送信し、マクロが展開されます。
- 3.The compiler replaces the macro call with its expanded form.
- 3.コンパイラはマクロ呼び出しをその展開された形式に置き換えます。
- 4.The compiler continues with compilation, using the expanded source code.
- 4.コンパイラは、展開されたソース コードを使用してコンパイルを続行します。
To go through the specific steps, consider the following:
具体的な手順を実行するには、次を考えてださい。
let magicNumber = #fourCharacterCode("ABCD")
The #fourCharacterCode macro takes a string that’s four characters long and returns an unsigned 32-bit integer that corresponds to the ASCII values in the string joined together. Some file formats use integers like this to identify data because they’re compact but still readable in a debugger. The Implementing a Macro section below shows how to implement this macro.
#fourCharacterCode マクロは、4 文字の長さの文字列を受け取り、結合された文字列内の ASCII 値に対応する符号なし 32 ビット整数を返します。 一部のファイル形式では、コンパクトでありながらデバッガーで読み取り可能なため、このような整数を使用してデータを識別します。 以下の「マクロの実装」セクションでは、このマクロを実装する方法を示します。
To expand the macros in the code above, the compiler reads the Swift file and creates an in-memory representation of that code known as an abstract syntax tree, or AST. The AST makes the code’s structure explicit, which makes it easier to write code that interacts with that structure — like a compiler or a macro implementation. Here’s a representation of the AST for the code above, slightly simplified by omitting some extra detail:
上記のコード内のマクロを展開するために、コンパイラは Swift ファイルを読み取り、抽象構文ツリー (AST) として知られるそのコードのメモリ内表現を作成します。 AST はコードの構造を明示的にするため、コンパイラーやマクロ実装など、その構造と対話するコードの作成が容易になります。 上記のコードの AST を以下に示します。余分な詳細を省略して少し簡略化しています。
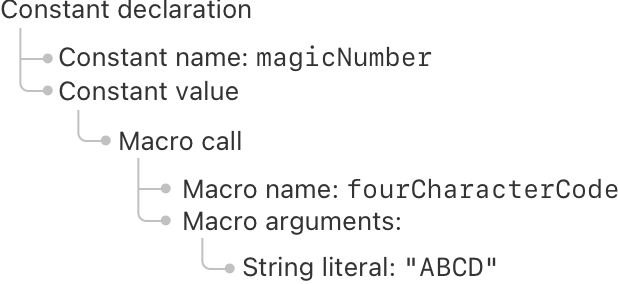
The diagram above shows how the structure of this code is represented in memory. Each element in the AST corresponds to a part of the source code. The “Constant declaration” AST element has two child elements under it, which represent the two parts of a constant declaration: its name and its value. The “Macro call” element has child elements that represent the macro’s name and the list of arguments being passed to the macro.
上の図は、このコードの構造がメモリ内でどのように表現されるかを示しています。 AST の各要素はソース コードの一部に対応します。 「定数宣言」AST 要素の下には 2 つの子要素があり、定数宣言の 2 つの部分 (名前と値) を表します。 「マクロ呼び出し」要素には、マクロの名前とマクロに渡される引数のリストを表す子要素があります。
As part of constructing this AST, the compiler checks that the source code is valid Swift. For example, #fourCharacterCode takes a single argument, which must be a string. If you tried to pass an integer argument, or forgot the quotation mark (") at the end of the string literal, you’d get an error at this point in the process.
この AST の構築の一環として、コンパイラはソース コードが有効な Swift であることを確認します。 たとえば、#fourCharacterCode は 1 つの引数を受け取り、これは文字列である必要があります。 整数の引数を渡そうとした場合、または文字列リテラルの末尾の引用符 (") を忘れた場合は、プロセスのこの時点でエラーが発生します。
The compiler finds the places in the code where you call a macro, and loads the external binary that implements those macros. For each macro call, the compiler passes part of the AST to that macro’s implementation. Here’s a representation of that partial AST:
コンパイラは、コード内でマクロを呼び出す場所を見つけ、それらのマクロを実装する外部バイナリをロードします。 マクロ呼び出しごとに、コンパイラは AST の一部をそのマクロの実装に渡します。 以下はその部分的な AST の表現です。
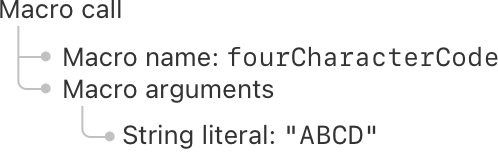
The implementation of the #fourCharacterCode macro reads this partial AST as its input when expanding the macro. A macro’s implementation operates only on the partial AST that it receives as its input, meaning a macro always expands the same way regardless of what code comes before and after it. This limitation helps make macro expansion easier to understand, and helps your code build faster because Swift can avoid expanding macros that haven’t changed.
#fourCharacterCode マクロの実装は、マクロを展開するときにこの部分的な AST を入力として読み取ります。 マクロの実装は、入力として受け取る部分的な AST でのみ動作します。つまり、マクロは、その前後にどのようなコードがあるかに関係なく、常に同じ方法で展開されます。 この制限により、マクロの展開が理解しやすくなり、Swift が変更されていないマクロの展開を回避できるため、コードのビルドが高速化されます。
Swift helps macro authors avoid accidentally reading other input by restricting the code that implements macros:
Swift は、マクロを実装するコードを制限することで、マクロ作成者が誤って他の入力を読み取ることを避けるのに役立ちます。
- The AST passed to a macro implementation contains only the AST elements that represent the macro, not any of the code that comes before or after it.
- マクロ実装に渡される AST には、マクロを表す AST 要素のみが含まれており、その前後のコードは含まれません。
- The macro implementation runs in a sandboxed environment that prevents it from accessing the file system or the network.
- マクロの実装は、ファイル システムやネットワークにアクセスできないサンドボックス環境で実行されます。
In addition to these safeguards, the macro’s author is responsible for not reading or modifying anything outside of the macro’s inputs. For example, a macro’s expansion must not depend on the current time of day.
これらの安全対策に加えて、マクロの作成者には、マクロの入力以外のものを読み取ったり変更したりしない責任があります。 たとえば、マクロの展開は現在の時刻に依存してはなりません。
The implementation of #fourCharacterCode generates a new AST containing the expanded code. Here’s what that code returns to the compiler:
#fourCharacterCode を実装すると、拡張されたコードを含む新しい AST が生成されます。 そのコードがコンパイラに返す内容は次のとおりです。

When the compiler receives this expansion, it replaces the AST element that contains the macro call with the element that contains the macro’s expansion. After macro expansion, the compiler checks again to ensure the program is still syntactically valid Swift and all the types are correct. That produces a final AST that can be compiled as usual:
コンパイラはこの展開を受け取ると、マクロ呼び出しを含む AST 要素をマクロの展開を含む要素に置き換えます。 マクロ展開後、コンパイラはプログラムが依然として構文的に有効な Swift であり、すべての型が正しいことを再度チェックします。 これにより、通常どおりコンパイルできる最終的な AST が生成されます。
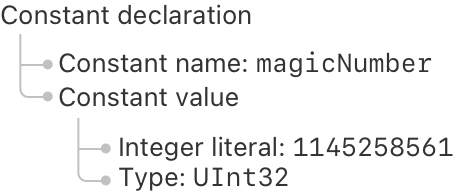
This AST corresponds to Swift code like this:
この AST は、次のような Swift コードに対応します。
let magicNumber = 1145258561 as UInt32
In this example, the input source code has only one macro, but a real program could have several instances of the same macro and several calls to different macros. The compiler expands macros one at a time.
この例では、入力ソース コードにはマクロが 1 つだけありますが、実際のプログラムには同じマクロのインスタンスが複数存在し、異なるマクロへの呼び出しが複数存在する可能性があります。 コンパイラはマクロを一度に 1 つずつ展開します。
If one macro appears inside another, the outer macro is expanded first — this lets the outer macro modify the inner macro before it’s expanded.
あるマクロが別のマクロの中にある場合、外側のマクロが最初に展開されます。これにより、外側のマクロは展開される前に内側のマクロを変更できます。
Implementing a Macro
マクロの実装
To implement a macro, you make two components: A type that performs the macro expansion, and a library that declares the macro to expose it as API. These parts are built separately from code that uses the macro, even if you’re developing the macro and its clients together, because the macro implementation runs as part of building the macro’s clients.
マクロを実装するには、2 つのコンポーネントを作成します。1 つはマクロ展開を実行する型、もう 1 つはマクロを宣言して API として公開するライブラリです。 マクロ実装はマクロのクライアント構築の一部として実行されるため、マクロとそのクライアントを一緒に開発している場合でも、これらの部分はマクロを使用するコードとは別に構築されます。
To create a new macro using Swift Package Manager, run swift package init --type macro — this creates several files, including a template for a macro implementation and declaration.
Swift Package Manager を使用して新しいマクロを作成するには、swift package init --type macro を実行します。これにより、マクロの実装と宣言のテンプレートを含むいくつかのファイルが作成されます。
To add macros to an existing project, edit the beginning of your Package.swift file as follows:
既存のプロジェクトにマクロを追加するには、Package.swift ファイルの先頭を次のように編集します。
- Set a Swift tools version of 5.9 or later in the
swift-tools-versioncomment. swift-tools-versionコメントで Swift ツールのバージョン 5.9 以降を設定します。- Import the
CompilerPluginSupportmodule. CompilerPluginSupportモジュールをインポートします。- Include macOS 10.15 as a minimum deployment target in the
platformslist. - プラットフォーム リストの最小導入ターゲットとして macOS 10.15 を含めます。
The code below shows the beginning of an example Package.swift file.
以下のコードは、Package.swift ファイルの例の先頭を示しています。
// swift-tools-version: 5.9


import PackageDescription
import CompilerPluginSupport


let package = Package(
    name: "MyPackage",
    platforms: [ .iOS(.v17), .macOS(.v13)],
    // ...
)
Next, add a target for the macro implementation and a target for the macro library to your existing Package.swift file. For example, you can add something like the following, changing the names to match your project:
次に、マクロ実装のターゲットとマクロ ライブラリのターゲットを既存の Package.swift ファイルに追加します。 たとえば、プロジェクトに合わせて名前を変更して、次のようなものを追加できます。
targets: [
    // Macro implementation that performs the source transformations.
    .macro(
        name: "MyProjectMacros",
        dependencies: [
            .product(name: "SwiftSyntaxMacros", package: "swift-syntax"),
            .product(name: "SwiftCompilerPlugin", package: "swift-syntax")
        ]
    ),


    // Library that exposes a macro as part of its API.
    .target(name: "MyProject", dependencies: ["MyProjectMacros"]),
]
The code above defines two targets: MyProjectMacros contains the implementation of the macros, and MyProject makes those macros available.
上記のコードは 2 つのターゲットを定義しています。MyProjectMacros にはマクロの実装が含まれており、MyProject にはこれらのマクロが使用可能になります。
The implementation of a macro uses the SwiftSyntax module to interact with Swift code in a structured way, using an AST. If you created a new macro package with Swift Package Manager, the generated Package.swift file automatically includes a dependency on SwiftSyntax. If you’re adding macros to an existing project, add a dependency on SwiftSyntax in your Package.swift file:
マクロの実装では、SwiftSyntax モジュールを使用して、AST を使用して構造化された方法で Swift コードと対話します。 Swift Package Manager を使用して新しいマクロ パッケージを作成した場合、生成された Package.swift ファイルには、SwiftSyntax への依存関係が自動的に含まれます。 既存のプロジェクトにマクロを追加する場合は、Package.swift ファイルに SwiftSyntax への依存関係を追加します。
dependencies: [
    .package(url: "https://github.com/apple/swift-syntax", from: "509.0.0")
],
Depending on your macro’s role, there’s a corresponding protocol from SwiftSyntax that the macro implementation conforms to. For example, consider #fourCharacterCode from the previous section. Here’s a structure that implements that macro:
マクロの役割に応じて、マクロ実装が準拠する SwiftSyntax の対応するプロトコルがあります。 たとえば、前のセクションの #fourCharacterCode について考えてみましょう。 そのマクロを実装する構造は次のとおりです。
import SwiftSyntax
import SwiftSyntaxMacros


public struct FourCharacterCode: ExpressionMacro {
    public static func expansion(
        of node: some FreestandingMacroExpansionSyntax,
        in context: some MacroExpansionContext
    ) throws -> ExprSyntax {
        guard let argument = node.argumentList.first?.expression,
              let segments = argument.as(StringLiteralExprSyntax.self)?.segments,
              segments.count == 1,
              case .stringSegment(let literalSegment)? = segments.first
        else {
            throw CustomError.message("Need a static string")
        }


        let string = literalSegment.content.text
        guard let result = fourCharacterCode(for: string) else {
            throw CustomError.message("Invalid four-character code")
        }


        return "\(raw: result) as UInt32"
    }
}


private func fourCharacterCode(for characters: String) -> UInt32? {
    guard characters.count == 4 else { return nil }


    var result: UInt32 = 0
    for character in characters {
        result = result << 8
        guard let asciiValue = character.asciiValue else { return nil }
        result += UInt32(asciiValue)
    }
    return result
}
enum CustomError: Error { case message(String) }
If you’re adding this macro to an existing Swift Package Manager project, add a type that acts as the entry point for the macro target and lists the macros that the target defines:
このマクロを既存の Swift Package Manager プロジェクトに追加する場合は、マクロ ターゲットのエントリ ポイントとして機能し、ターゲットが定義するマクロをリストするタイプを追加します。
import SwiftCompilerPlugin


@main
struct MyProjectMacros: CompilerPlugin {
    var providingMacros: [Macro.Type] = [FourCharacterCode.self]
}
The #fourCharacterCode macro is a freestanding macro that produces an expression, so the FourCharacterCode type that implements it conforms to the ExpressionMacro protocol. The ExpressionMacro protocol has one requirement, an expansion(of:in:) method that expands the AST. For the list of macro roles and their corresponding SwiftSyntax protocols, see attached and freestanding in Attributes.
#fourCharacterCode マクロは式を生成する独立したマクロであるため、それを実装する FourCharacterCode タイプは ExpressionMacro プロトコルに準拠します。 ExpressionMacro プロトコルには 1 つの要件、AST を展開する expansion(of:in:) メソッドがあります。 マクロの役割とそれに対応する SwiftSyntax プロトコルのリストについては、「属性」の「添付」と「自立型」を参照してください。
To expand the #fourCharacterCode macro, Swift sends the AST for the code that uses this macro to the library that contains the macro implementation. Inside the library, Swift calls FourCharacterCode.expansion(of:in:), passing in the AST and the context as arguments to the method. The implementation of expansion(of:in:) finds the string that was passed as an argument to #fourCharacterCode and calculates the corresponding 32-bit unsigned integer literal value.
#fourCharacterCode マクロを展開するために、Swift はこのマクロを使用するコードの AST をマクロ実装を含むライブラリに送信します。 ライブラリ内で、Swift は FourCharacterCode.expansion(of:in:) を呼び出し、AST とコンテキストを引数としてメソッドに渡します。 Expansion(of:in:) の実装は、#fourCharacterCode に引数として渡された文字列を検索し、対応する 32 ビット符号なし整数リテラル値を計算します。
In the example above, the first guard block extracts the string literal from the AST, assigning that AST element to literalSegment. The second guard block calls the private fourCharacterCode(for:) function. Both of these blocks throw an error if the macro is used incorrectly — the error message becomes a compiler error at the malformed call site. For example, if you try to call the macro as #fourCharacterCode("AB" + "CD") the compiler shows the error “Need a static string”.
上の例では、最初のguard ブロックは AST から文字列リテラルを抽出し、その AST 要素を literalSegment に割り当てます。 2 番目のguard ブロックは、プライベートの fourCharacterCode(for:) 関数を呼び出します。 マクロが正しく使用されない場合、これらのブロックはどちらもエラーをスローします。エラー メッセージは、不正な形式の呼び出しサイトでコンパイラ エラーになります。 たとえば、#fourCharacterCode("AB" + "CD") としてマクロを呼び出そうとすると、コンパイラは「静的文字列が必要です」というエラーを表示します。
The expansion(of:in:) method returns an instance of ExprSyntax, a type from SwiftSyntax that represents an expression in an AST. Because this type conforms to the StringLiteralConvertible protocol, the macro implementation uses a string literal as a lightweight syntax to create its result. All of the SwiftSyntax types that you return from a macro implementation conform to StringLiteralConvertible, so you can use this approach when implementing any kind of macro.
Expansion(of:in:) メソッドは、AST 内の式を表す SwiftSyntax の型である ExprSyntax のインスタンスを返します。 この型は StringLiteralConvertible プロトコルに準拠しているため、マクロ実装は結果を作成するための軽量構文として文字列リテラルを使用します。 マクロ実装から返される SwiftSyntax タイプはすべて StringLiteralConvertible に準拠しているため、あらゆる種類のマクロを実装するときにこのアプローチを使用できます。
Developing and Debugging Macros
マクロの開発とデバッグ
Macros are well suited to development using tests: They transform one AST into another AST without depending on any external state, and without making changes to any external state. In addition, you can create syntax nodes from a string literal, which simplifies setting up the input for a test. You can also read the description property of an AST to get a string to compare against an expected value. For example, here’s a test of the #fourCharacterCode macro from previous sections:
マクロは、テストを使用した開発に適しています。マクロは、外部状態に依存せず、外部状態を変更することなく、ある AST を別の AST に変換します。 さらに、文字列リテラルから構文ノードを作成できるため、テストの入力のセットアップが簡素化されます。 AST の description プロパティを読んで、期待値と比較する文字列を取得することもできます。 たとえば、前のセクションの #fourCharacterCode マクロのテストを次に示します。
let source: SourceFileSyntax =
    """
    let abcd = #fourCharacterCode("ABCD")
    """


let file = BasicMacroExpansionContext.KnownSourceFile(
    moduleName: "MyModule",
    fullFilePath: "test.swift"
)


let context = BasicMacroExpansionContext(sourceFiles: [source: file])


let transformedSF = source.expand(
    macros:["fourCharacterCode": FourCharacterCode.self],
    in: context
)


let expectedDescription =
    """
    let abcd = 1145258561 as UInt32
    """


precondition(transformedSF.description == expectedDescription)
The example above tests the macro using a precondition, but you could use a testing framework instead.
上の例では前提条件を使用してマクロをテストしていますが、代わりにテスト フレームワークを使用することもできます。