
制御フロー
日本語を消す 英語を消すStructure code with branches, loops, and early exits.
分岐、ループ、早期終了を含む構造コード。
下記URLから引用し、日本語訳をつけてみました。
https://docs.swift.org/swift-book/documentation/the-swift-programming-language/controlflow
Swift provides a variety of control flow statements. These include while loops to perform a task multiple times; if, guard, and switch statements to execute different branches of code based on certain conditions; and statements such as break and continue to transfer the flow of execution to another point in your code. Swift provides a for–in loop that makes it easy to iterate over arrays, dictionaries, ranges, strings, and other sequences. Swift also provides defer statements, which wrap code to be executed when leaving the current scope.
Swift は、さまざまな制御フロー ステートメントを提供します。 これには、タスクを複数回実行する while ループが含まれます。 if、guard、switch ステートメントを使用して、特定の条件に基づいてコードのさまざまな分岐を実行します。 また、break や continue などのステートメントは、実行フローをコード内の別のポイントに転送します。 Swift は、配列、辞書、範囲、文字列、その他のシーケンスを簡単に反復できる for-in ループを提供します。 Swift には、現在のスコープを離れるときに実行されるコードをラップする defer ステートメントも用意されています。
Swift’s switch statement is considerably more powerful than its counterpart in many C-like languages. Cases can match many different patterns, including interval matches, tuples, and casts to a specific type. Matched values in a switch case can be bound to temporary constants or variables for use within the case’s body, and complex matching conditions can be expressed with a where clause for each case.
Swift の switch ステートメントは、多くの C 系言語の switch ステートメントよりもかなり強力です。 ケースは、間隔一致、タプル、特定の型へのキャストなど、さまざまなパターンに一致します。 switch ケース内の一致した値は、ケース本体内で使用する一時的な定数または変数にバインドでき、複雑な一致条件は各ケースの where 句で表現できます。
For-In Loops
For-In ループ
You use the for–in loop to iterate over a sequence, such as items in an array, ranges of numbers, or characters in a string.
for-in ループを使用して、配列内の項目、数値範囲、文字列内の文字などのシーケンスを反復処理します。
This example uses a for–in loop to iterate over the items in an array:
この例では、for-in ループを使用して配列内の項目を反復処理します。
let names = ["Anna", "Alex", "Brian", "Jack"]
for name in names {
    print("Hello, \(name)!")
}
// Hello, Anna!
// Hello, Alex!
// Hello, Brian!
// Hello, Jack!
You can also iterate over a dictionary to access its key-value pairs. Each item in the dictionary is returned as a (key, value) tuple when the dictionary is iterated, and you can decompose the (key, value) tuple’s members as explicitly named constants for use within the body of the for–in loop. In the code example below, the dictionary’s keys are decomposed into a constant called animalName, and the dictionary’s values are decomposed into a constant called legCount.
ディクショナリを反復処理して、そのキーと値のペアにアクセスすることもできます。 辞書内の各項目は、辞書が反復処理されるときに(key, value) タプルとして返されます。(key, value) タプルのメンバーを、for-in ループの本体内で使用する明示的に名前が付けられた定数として分解できます。 以下のコード例では、辞書のキーはanimalNameという定数に分解され、辞書の値はlegCountという定数に分解されます。
let numberOfLegs = ["spider": 8, "ant": 6, "cat": 4]
for (animalName, legCount) in numberOfLegs {
    print("\(animalName)s have \(legCount) legs")
}
// cats have 4 legs
// ants have 6 legs
// spiders have 8 legs
The contents of a Dictionary are inherently unordered, and iterating over them doesn’t guarantee the order in which they will be retrieved. In particular, the order you insert items into a Dictionary doesn’t define the order they’re iterated. For more about arrays and dictionaries, see Collection Types.
Dictionary の内容は本質的に順序付けされていないため、辞書を反復処理しても、取得される順序は保証されません。 特に、Dictionary に項目を挿入する順序は、項目が反復される順序を定義しません。 配列と辞書の詳細については、「コレクション タイプ」を参照してください。
You can also use for–in loops with numeric ranges. This example prints the first few entries in a five-times table:
数値範囲を指定した for-in ループを使用することもできます。 この例では、5 回のテーブルの最初のいくつかのエントリを出力します。
for index in 1...5 {
    print("\(index) times 5 is \(index * 5)")
}
// 1 times 5 is 5
// 2 times 5 is 10
// 3 times 5 is 15
// 4 times 5 is 20
// 5 times 5 is 25
The sequence being iterated over is a range of numbers from 1 to 5, inclusive, as indicated by the use of the closed range operator (...). The value of index is set to the first number in the range (1), and the statements inside the loop are executed. In this case, the loop contains only one statement, which prints an entry from the five-times table for the current value of index. After the statement is executed, the value of index is updated to contain the second value in the range (2), and the print(_:separator:terminator:) function is called again. This process continues until the end of the range is reached.
反復されるシーケンスは、閉範囲演算子 (…) の使用によって示されるように、1 から 5 までの範囲の数値です。 indexの値は範囲 (1) の最初の数値に設定され、ループ内のステートメントが実行されます。 この場合、ループにはステートメントが 1 つだけ含まれており、indexの現在の値から 5 回 テーブルからエントリを出力します。 ステートメントが実行されると、indexの値が範囲 (2) の 2 番目の値を含むように更新され、print(_:separator:terminator:) 関数が再度呼び出されます。 このプロセスは、範囲の終わりに到達するまで続きます。
In the example above, index is a constant whose value is automatically set at the start of each iteration of the loop. As such, index doesn’t have to be declared before it’s used. It’s implicitly declared simply by its inclusion in the loop declaration, without the need for a let declaration keyword.
上の例では、index は定数であり、その値はループの各反復の開始時に自動的に設定されます。 そのため、indexは使用前に宣言する必要はありません。 let 宣言キーワードを必要とせず、ループ宣言に含めるだけで暗黙的に宣言されます。
If you don’t need each value from a sequence, you can ignore the values by using an underscore in place of a variable name.
シーケンスの各値が必要ない場合は、変数名の代わりにアンダースコアを使用して値を無視できます。
let base = 3
let power = 10
var answer = 1
for _ in 1...power {
    answer *= base
}
print("\(base) to the power of \(power) is \(answer)")
// Prints "3 to the power of 10 is 59049"
The example above calculates the value of one number to the power of another (in this case, 3 to the power of 10). It multiplies a starting value of 1 (that is, 3 to the power of 0) by 3, ten times, using a closed range that starts with 1 and ends with 10. For this calculation, the individual counter values each time through the loop are unnecessary — the code simply executes the loop the correct number of times. The underscore character (_) used in place of a loop variable causes the individual values to be ignored and doesn’t provide access to the current value during each iteration of the loop.
上の例では、ある数値の値を別の数値で乗算します(この場合、3 の 10 乗)。 1 で始まり 10 で終わる閉範囲を使用して、開始値 1 (つまり 3 の 0 乗) を 3 で 10 回します。この計算では、ループを通過するたびに個々のカウンター値が計算されますが、コードはループを正しい回数だけ実行するだけなので、カウンター値は不要です。 ループ変数の代わりにアンダースコア文字 (_) を使用すると、個々の値が無視され、ループの各反復中に現在の値にアクセスできなくなります。
In some situations, you might not want to use closed ranges, which include both endpoints. Consider drawing the tick marks for every minute on a watch face. You want to draw 60 tick marks, starting with the 0 minute. Use the half-open range operator (..<) to include the lower bound but not the upper bound. For more about ranges, see Range Operators.
状況によっては、両方のエンドポイントを含む閉じた範囲を使用したくない場合があります。 時計の文字盤に 1 分ごとに目盛りを描くことを検討してください。 0 分から始めて 60 個の目盛りを描画したいとします。 半開範囲演算子 (..<) を使用して、下限を含めますが、上限は含めません。 範囲の詳細については、「範囲演算子」をご覧ください。
let minutes = 60
for tickMark in 0..<minutes {
    // render the tick mark each minute (60 times)
}
Some users might want fewer tick marks in their UI. They could prefer one mark every 5 minutes instead. Use the stride(from:to:by:) function to skip the unwanted marks.
ユーザーによっては、UI の目盛りを減らしたい場合があります。 代わりに、5 分ごとに 1 つのマークを付けることもできます。 stride(from:to:by:) 関数を使用して、不要なマークをスキップします。
let minuteInterval = 5
for tickMark in stride(from: 0, to: minutes, by: minuteInterval) {
    // render the tick mark every 5 minutes (0, 5, 10, 15 ... 45, 50, 55)
}
Closed ranges are also available, by using stride(from:through:by:) instead:
代わりに stride(from:through:by:) を使用することで、閉じた範囲も利用できます。
let hours = 12
let hourInterval = 3
for tickMark in stride(from: 3, through: hours, by: hourInterval) {
    // render the tick mark every 3 hours (3, 6, 9, 12)
}
The examples above use a for–in loop to iterate ranges, arrays, dictionaries, and strings. However, you can use this syntax to iterate any collection, including your own classes and collection types, as long as those types conform to the Sequence(Link:developer.apple.com) protocol.
上記の例では、for-in ループを使用して範囲、配列、辞書、文字列を反復処理しています。 ただし、これらの型が Sequence (Link:developer.apple.com)(英語)プロトコルに準拠している限り、この構文を使用して、独自のクラスやコレクション型を含む任意のコレクションを反復処理できます。
While Loops
While ループ
A while loop performs a set of statements until a condition becomes false. These kinds of loops are best used when the number of iterations isn’t known before the first iteration begins. Swift provides two kinds of while loops:
while ループは、条件が false になるまで一連のステートメントを実行します。 この種のループは、最初の反復が開始される前に反復回数が不明な場合に最適に使用されます。 Swift は 2 種類の while ループを提供します。
whileevaluates its condition at the start of each pass through the loop.whileは、ループの各パスの開始時に状態を評価します。repeat–whileevaluates its condition at the end of each pass through the loop.repeat-whileは、ループの各パスの終了時に状態を評価します。
While
その間
A while loop starts by evaluating a single condition. If the condition is true, a set of statements is repeated until the condition becomes false.
while ループは、単一の条件を評価することから始まります。 条件が true の場合、条件が false になるまで一連のステートメントが繰り返されます。
Here’s the general form of a while loop:
while ループの一般的な形式は次のとおりです。
while <#condition#> {
   <#statements#>;
}
This example plays a simple game of Snakes and Ladders (also known as Chutes and Ladders):
この例では、ヘビとはしご(シュートとはしごとしても知られています)の簡単なゲームをプレイします。

The rules of the game are as follows:
ゲームのルールは次のとおりです。
- The board has 25 squares, and the aim is to land on or beyond square 25.
- ボードには 25 のマス目があり、目的は 25 マス目以降に着地することです。
- The player’s starting square is “square zero”, which is just off the bottom-left corner of the board.
- プレイヤーの開始マスは「スクエア ゼロ」で、ボードの左下隅のすぐ外にあります。
- Each turn, you roll a six-sided dice and move by that number of squares, following the horizontal path indicated by the dotted arrow above.
- 各ターン、あなたは 6 面体のサイコロを転がし、上の点線の矢印で示された水平方向のパスに従って、そのマス数だけ移動します。
- If your turn ends at the bottom of a ladder, you move up that ladder.
- 自分のターンがはしごの下で終了した場合は、そのはしごを上っていきます。
- If your turn ends at the head of a snake, you move down that snake.
- 蛇の頭でターンが終了した場合は、その蛇の下に移動します。
The game board is represented by an array of Int values. Its size is based on a constant called finalSquare, which is used to initialize the array and also to check for a win condition later in the example. Because the players start off the board, on “square zero”, the board is initialized with 26 zero Int values, not 25.
ゲームボードは、Int 値の配列で表されます。 そのサイズは、finalSquare と呼ばれる定数に基づいています。この定数は、配列を初期化するためと、例の後半で勝利条件をチェックするためにも使用されます。 プレーヤーはボードの「ゼロの平方」からスタートするため、ボードは 25 ではなく 26 のゼロ Int 値で初期化されます。
let finalSquare = 25
var board = [Int](repeating: 0, count: finalSquare + 1)
Some squares are then set to have more specific values for the snakes and ladders. Squares with a ladder base have a positive number to move you up the board, whereas squares with a snake head have a negative number to move you back down the board.
いくつかの四角形は、ヘビとはしごに対してより具体的な値を持つように設定されます。 はしごの底のあるマス目はボードの上に移動するための正の数を持ち、ヘビの頭のあるマス目はボードを下に移動するための負の数を持っています。
board[03] = +08; board[06] = +11; board[09] = +09; board[10] = +02
board[14] = -10; board[19] = -11; board[22] = -02; board[24] = -08
Square 3 contains the bottom of a ladder that moves you up to square 11. To represent this, board[03] is equal to +08, which is equivalent to an integer value of 8 (the difference between 3 and 11). To align the values and statements, the unary plus operator (+i) is explicitly used with the unary minus operator (-i) and numbers lower than 10 are padded with zeros. (Neither stylistic technique is strictly necessary, but they lead to neater code.)
正方形 3 には、正方形 11 まで移動するはしごの底が含まれています。これを表すと、board[03] は +08 に等しく、これは整数値 8 (3 と 11 の差) に相当します。 値とステートメントを揃えるには、単項プラス演算子 (+i) が単項マイナス演算子 (-i) とともに明示的に使用され、10 未満の数値はゼロで埋められます。 (どちらの文体テクニックも厳密に必要というわけではありませんが、コードがよりきれいになります。)
var square = 0
var diceRoll = 0
while square < finalSquare {
    // roll the dice
    diceRoll += 1
    if diceRoll == 7 { diceRoll = 1 }
    // move by the rolled amount
    square += diceRoll
    if square < board.count {
        // if we're still on the board, move up or down for a snake or a ladder
        square += board[square]
    }
}
print("Game over!")
The example above uses a very simple approach to dice rolling. Instead of generating a random number, it starts with a diceRoll value of 0. Each time through the while loop, diceRoll is incremented by one and is then checked to see whether it has become too large. Whenever this return value equals 7, the dice roll has become too large and is reset to a value of 1. The result is a sequence of diceRoll values that’s always 1, 2, 3, 4, 5, 6, 1, 2 and so on.
上の例では、サイコロを振るのに非常に単純なアプローチを使用しています。 乱数を生成する代わりに、diceRoll 値 0 から始まります。while ループを通過するたびに、diceRoll は 1 ずつ増加し、それが大きくなりすぎていないかどうかがチェックされます。 この戻り値が 7 に等しい場合は、サイコロの出目が大きすぎるため、値 1 にリセットされます。結果は、常に 1、2、3、4、5、6、1、2 などとなる一連の diceRoll 値になります。 の上。
After rolling the dice, the player moves forward by diceRoll squares. It’s possible that the dice roll may have moved the player beyond square 25, in which case the game is over. To cope with this scenario, the code checks that square is less than the board array’s count property. If square is valid, the value stored in board[square] is added to the current square value to move the player up or down any ladders or snakes.
サイコロを振った後、プレイヤーはdiceRollのマス目ずつ前進します。 サイコロの目によってプレイヤーが 25 マス目以降に移動した可能性があり、その場合はゲームが終了します。 このシナリオに対処するために、コードは正方形がボード配列の count プロパティより小さいことをチェックします。 square が有効な場合、board[square] に保存されている値が現在の square 値に追加され、プレイヤーははしごやヘビを上下に移動します。
Note
注釈
If this check isn’t performed, board[square] might try to access a value outside the bounds of the board array, which would trigger a runtime error.
このチェックが実行されない場合、board[square] はboard配列の境界外の値にアクセスしようとする可能性があり、実行時エラーが発生します。
The current while loop execution then ends, and the loop’s condition is checked to see if the loop should be executed again. If the player has moved on or beyond square number 25, the loop’s condition evaluates to false and the game ends.
現在の while ループの実行が終了し、ループの条件がチェックされてループを再度実行する必要があるかどうかが確認されます。 プレイヤーがマス目 25 以降に移動した場合、ループの条件は false と評価され、ゲームは終了します。
A while loop is appropriate in this case, because the length of the game isn’t clear at the start of the while loop. Instead, the loop is executed until a particular condition is satisfied.
while ループの開始時点ではゲームの長さが明確ではないため、この場合は while ループが適切です。 代わりに、特定の条件が満たされるまでループが実行されます。
Repeat-While
繰り返しーその間
The other variation of the while loop, known as the repeat–while loop, performs a single pass through the loop block first, before considering the loop’s condition. It then continues to repeat the loop until the condition is false.
while ループのもう 1 つのバリエーションは、repeat-while ループとして知られており、ループの条件を考慮する前に、まずループ ブロックを 1 回通過します。 その後、条件が false になるまでループを繰り返します。
Note
注釈
The repeat–while loop in Swift is analogous to a do–while loop in other languages.
Swift のrepeat-whileループは、他の言語のdo-whileループに似ています。
Here’s the general form of a repeat–while loop:
これは、repeat-while ループの一般的な形式です。
repeat {
   <#statements#>
} while <#condition#>
Here’s the Snakes and Ladders example again, written as a repeat–while loop rather than a while loop. The values of finalSquare, board, square, and diceRoll are initialized in exactly the same way as with a while loop.
ここでも、蛇とはしごの例を示します。これは、while ループではなく、repeat-while ループとして書かれています。 FinalSquare、board、square、diceRoll の値は、while ループの場合とまったく同じ方法で初期化されます。
let finalSquare = 25
var board = [Int](repeating: 0, count: finalSquare + 1)
board[03] = +08; board[06] = +11; board[09] = +09; board[10] = +02
board[14] = -10; board[19] = -11; board[22] = -02; board[24] = -08
var square = 0
var diceRoll = 0
In this version of the game, the first action in the loop is to check for a ladder or a snake. No ladder on the board takes the player straight to square 25, and so it isn’t possible to win the game by moving up a ladder. Therefore, it’s safe to check for a snake or a ladder as the first action in the loop.
このバージョンのゲームでは、ループの最初のアクションは、はしごまたはヘビをチェックすることです。 ボード上にはプレイヤーを直接 25 マス目に導くはしごがないため、はしごを上ってゲームに勝つことはできません。 したがって、ループの最初のアクションとしてヘビまたははしごをチェックするのが安全です。
At the start of the game, the player is on “square zero”. board[0] always equals 0 and has no effect.
ゲーム開始時、プレイヤーは「ゼロマス」にいます。 board[0] は常に 0 に等しく、効果はありません。
repeat {
    // move up or down for a snake or ladder
    square += board[square]
    // roll the dice
    diceRoll += 1
    if diceRoll == 7 { diceRoll = 1 }
    // move by the rolled amount
    square += diceRoll
} while square < finalSquare
print("Game over!")
After the code checks for snakes and ladders, the dice is rolled and the player is moved forward by diceRoll squares. The current loop execution then ends.
コードがヘビやはしごをチェックした後、サイコロが振られ、プレーヤーはdiceRollのマス目だけ前進します。 その後、現在のループの実行が終了します。
The loop’s condition (while square < finalSquare) is the same as before, but this time it’s not evaluated until the end of the first run through the loop. The structure of the repeat–while loop is better suited to this game than the while loop in the previous example. In the repeat–while loop above, square += board[square] is always executed immediately after the loop’s while condition confirms that square is still on the board. This behavior removes the need for the array bounds check seen in the while loop version of the game described earlier.
ループの条件(while square < finalSquare)は前と同じですが、今回はループの最初の実行が終了するまで評価されません。 repeat-while ループの構造は、前の例の while ループよりもこのゲームに適しています。 上記のrepeat-whileループでは、square += board[square]は常に、ループのwhile条件でsquareがまだボード上にあることが確認された直後に実行されます。 この動作により、前に説明したゲームの while ループ バージョンで見られた配列境界チェックが必要なくなります。
Conditional Statements
条件文
It’s often useful to execute different pieces of code based on certain conditions. You might want to run an extra piece of code when an error occurs, or to display a message when a value becomes too high or too low. To do this, you make parts of your code conditional.
多くの場合、特定の条件に基づいてさまざまなコードを実行すると便利です。 エラーが発生したときに追加のコードを実行したり、値が高すぎたり低すぎたりしたときにメッセージを表示したい場合があります。 これを行うには、コードの一部を条件付きにします。
Swift provides two ways to add conditional branches to your code: the if statement and the switch statement. Typically, you use the if statement to evaluate simple conditions with only a few possible outcomes. The switch statement is better suited to more complex conditions with multiple possible permutations and is useful in situations where pattern matching can help select an appropriate code branch to execute.
Swift では、コードに条件分岐を追加する 2 つの方法、if ステートメントと switch ステートメントが提供されます。 通常、if ステートメントは、考えられる結果が少数である単純な条件を評価するために使用します。 switch ステートメントは、複数の可能な置換を含むより複雑な条件に適しており、パターン マッチングが実行する適切なコード ブランチの選択に役立つ場合に役立ちます。
If
もし
In its simplest form, the if statement has a single if condition. It executes a set of statements only if that condition is true.
最も単純な形式では、if ステートメントには単一の if 条件があります。 その条件が true の場合にのみ、一連のステートメントを実行します。
var temperatureInFahrenheit = 30
if temperatureInFahrenheit <= 32 {
    print("It's very cold. Consider wearing a scarf.")
}
// Prints "It's very cold. Consider wearing a scarf."
The example above checks whether the temperature is less than or equal to 32 degrees Fahrenheit (the freezing point of water). If it is, a message is printed. Otherwise, no message is printed, and code execution continues after the if statement’s closing brace.
上の例では、温度が華氏 32 度 (水の凝固点) 以下であるかどうかをチェックします。 そうであれば、メッセージが出力されます。 それ以外の場合、メッセージは出力されず、コードの実行は if ステートメントの右中括弧の後に続行されます。
The if statement can provide an alternative set of statements, known as an else clause, for situations when the if condition is false. These statements are indicated by the else keyword.
if ステートメントは、if 条件が false の場合に、else 節として知られる代替ステートメントのセットを提供できます。 これらのステートメントは、else キーワードで示されます。
temperatureInFahrenheit = 40
if temperatureInFahrenheit <= 32 {
    print("It's very cold. Consider wearing a scarf.")
} else {
    print("It's not that cold. Wear a T-shirt.")
}
// Prints "It's not that cold. Wear a T-shirt."
One of these two branches is always executed. Because the temperature has increased to 40 degrees Fahrenheit, it’s no longer cold enough to advise wearing a scarf and so the else branch is triggered instead.
これら 2 つの分岐のうち 1 つは常に実行されます。 気温が華氏 40 度まで上昇したため、スカーフを着用することをお勧めするほど寒くなくなり、代わりに else ブランチがトリガーされます。
You can chain multiple if statements together to consider additional clauses.
複数の if ステートメントを連結して追加の句を検討できます。
temperatureInFahrenheit = 90
if temperatureInFahrenheit <= 32 {
    print("It's very cold. Consider wearing a scarf.")
} else if temperatureInFahrenheit >= 86 {
    print("It's really warm. Don't forget to wear sunscreen.")
} else {
    print("It's not that cold. Wear a T-shirt.")
}
// Prints "It's really warm. Don't forget to wear sunscreen."
Here, an additional if statement was added to respond to particularly warm temperatures. The final else clause remains, and it prints a response for any temperatures that aren’t too warm or too cold.
ここでは、特に暖かい気温に対応するために if ステートメントが追加されました。 最後の else 節は残り、暑すぎず寒すぎない温度に対する応答を出力します。
The final else clause is optional, however, and can be excluded if the set of conditions doesn’t need to be complete.
ただし、最後の else 節はオプションであり、一連の条件を完了する必要がない場合は除外できます。
temperatureInFahrenheit = 72
if temperatureInFahrenheit <= 32 {
    print("It's very cold. Consider wearing a scarf.")
} else if temperatureInFahrenheit >= 86 {
    print("It's really warm. Don't forget to wear sunscreen.")
}
Because the temperature isn’t cold enough to trigger the if condition or warm enough to trigger the else if condition, no message is printed.
if 条件をトリガーできるほど気温が低くなく、else if 条件をトリガーできるほど気温が高くないため、メッセージは出力されません。
Swift provides a shorthand spelling of if that you can use when setting values. For example, consider the following code:
Swift では、値を設定するときに使用できる if の省略表記が提供されています。 たとえば、次のコードを考えてみましょう。
let temperatureInCelsius = 25
let weatherAdvice: String


if temperatureInCelsius <= 0 {
    weatherAdvice = "It's very cold. Consider wearing a scarf."
} else if temperatureInCelsius >= 30 {
    weatherAdvice = "It's really warm. Don't forget to wear sunscreen."
} else {
    weatherAdvice = "It's not that cold. Wear a T-shirt."
}


print(weatherAdvice)
// Prints "It's not that cold. Wear a T-shirt."
Here, each of the branches sets a value for the weatherAdvice constant, which is printed after the if statement.
ここで、各ブランチは、if ステートメントの後に出力される WeatherAdvice 定数の値を設定します。
Using the alternate syntax, known as an if expression, you can write this code more concisely:
if 式として知られる代替構文を使用すると、このコードをより簡潔に記述することができます。
let weatherAdvice = if temperatureInCelsius <= 0 {
    "It's very cold. Consider wearing a scarf."
} else if temperatureInCelsius >= 30 {
    "It's really warm. Don't forget to wear sunscreen."
} else {
    "It's not that cold. Wear a T-shirt."
}


print(weatherAdvice)
// Prints "It's not that cold. Wear a T-shirt."
In this if expression version, each branch contains a single value. If a branch’s condition is true, then that branch’s value is used as the value for the whole if expression in the assignment of weatherAdvice. Every if branch has a corresponding else if branch or else branch, ensuring that one of the branches always matches and that the if expression always produces a value, regardless of which conditions are true.
この if 式バージョンでは、各ブランチに 1 つの値が含まれます。 ブランチの条件が true の場合、そのブランチの値が、weatherAdvice の割り当ての if 式全体の値として使用されます。 すべての if 分岐には、対応する else if 分岐または else 分岐があり、どの条件が true であるかに関係なく、分岐の 1 つが常に一致し、if 式が常に値を生成することが保証されます。
Because the syntax for the assignment starts outside the if expression, there’s no need to repeat weatherAdvice = inside each branch. Instead, each branch of the if expression produces one of the three possible values for weatherAdvice, and the assignment uses that value.
割り当ての構文は if 式の外側から始まるため、各ブランチ内で WeatherAdvice = を繰り返す必要はありません。 代わりに、if 式の各分岐は、weatherAdvice の 3 つの可能な値のうち 1 つを生成し、割り当てではその値が使用されます。
All of the branches of an if expression need to contain values of the same type. Because Swift checks the type of each branch separately, values like nil that can be used with more than one type prevent Swift from determining the if expression’s type automatically. Instead, you need to specify the type explicitly — for example:
if 式のすべての分岐には、同じ型の値が含まれている必要があります。 Swift は各ブランチの型を個別にチェックするため、複数の型で使用できる nil のような値により、Swift が if 式の型を自動的に決定することができなくなります。 代わりに、タイプを明示的に指定する必要があります。たとえば、次のようになります。
let freezeWarning: String? = if temperatureInCelsius <= 0 {
    "It's below freezing. Watch for ice!"
} else {
    nil
}
In the code above, one branch of the if expression has a string value and the other branch has a nil value. The nil value could be used as a value for any optional type, so you have to explicitly write that freezeWarning is an optional string, as described in Type Annotations.
上記のコードでは、if 式の 1 つのブランチには文字列値があり、もう 1 つのブランチには nil 値があります。 nil 値は任意の型の値として使用できるため、型の注釈で説明されているように、freezeWarning がオプショナル文字列であることを明示的に記述する必要があります。
An alternate way to provide this type information is to provide an explicit type for nil, instead of providing an explicit type for freezeWarning:
このタイプ情報を提供する別の方法は、freezeWarning に明示的なタイプを提供する代わりに、nil に明示的なタイプを提供することです。
let freezeWarning = if temperatureInCelsius <= 0 {
    "It's below freezing. Watch for ice!"
} else {
    nil as String?
}
An if expression can respond to unexpected failures by throwing an error or calling a function like fatalError(_:file:line:) that never returns. For example:
if 式は、エラーをスローしたり、返されない FatalError(_:file:line:) のような関数を呼び出したりすることで、予期せぬ障害に対応できます。 例えば:
let weatherAdvice = if temperatureInCelsius > 100 {
    throw TemperatureError.boiling
} else {
    "It's a reasonable temperature."
}
In this example, the if expression checks whether the forecast temperature is hotter than 100° C — the boiling point of water. A temperature this hot causes the if expression to throw a .boiling error instead of returning a textual summary. Even though this if expression can throw an error, you don’t write try before it. For information about working with errors, see Error Handling.
この例では、if 式は予測温度が 100 ℃ (水の沸点) より高いかどうかをチェックします。 これほど高温になると、if 式はテキストの概要を返す代わりに、.boiling エラーをスローします。 この if 式はエラーをスローする可能性がありますが、その前に try を記述しないでください。 エラーの処理については、「エラー処理」を参照してください。
In addition to using if expressions on the right-hand side of an assignment, as shown in the examples above, you can also use them as the value that a function or closure returns.
上記の例に示すように、代入の右側で if 式を使用するだけでなく、関数やクロージャが返す値として使用することもできます。
Switch
切り変え
A switch statement considers a value and compares it against several possible matching patterns. It then executes an appropriate block of code, based on the first pattern that matches successfully. A switch statement provides an alternative to the if statement for responding to multiple potential states.
switch ステートメントは値を考慮し、それをいくつかの考えられる一致パターンと比較します。 次に、正常に一致した最初のパターンに基づいて、適切なコード ブロックを実行します。 switch ステートメントは、複数の潜在的な状態に応答するための if ステートメントの代替手段を提供します。
In its simplest form, a switch statement compares a value against one or more values of the same type.
最も単純な形式では、switch ステートメントは値を同じ型の 1 つ以上の値と比較します。
switch <#some value to consider#> {
case <#value 1#>:
    <#respond to value 1#>
case <#value 2#>,
    <#value 3#>:
    <#respond to value 2 or 3#>
default:
    <#otherwise, do something else#>
}
Every switch statement consists of multiple possible cases, each of which begins with the case keyword. In addition to comparing against specific values, Swift provides several ways for each case to specify more complex matching patterns. These options are described later in this chapter.
すべての switch ステートメントは複数の考えられるケースで構成されており、それぞれのケースは case キーワードで始まります。 特定の値との比較に加えて、Swift はケースごとに、より複雑な一致パターンを指定するいくつかの方法を提供します。 これらのオプションについては、この章で後ほど説明します。
Like the body of an if statement, each case is a separate branch of code execution. The switch statement determines which branch should be selected. This procedure is known as switching on the value that’s being considered.
if ステートメントの本文と同様に、各caseはコード実行の個別のブランチです。 switch ステートメントは、どのブランチを選択するかを決定します。 この手順は、考慮されている値に切り変えることとして知られています。
Every switch statement must be exhaustive. That is, every possible value of the type being considered must be matched by one of the switch cases. If it’s not appropriate to provide a case for every possible value, you can define a default case to cover any values that aren’t addressed explicitly. This default case is indicated by the default keyword, and must always appear last.
すべての switch ステートメントは網羅的である必要があります。 つまり、考慮されているタイプのすべての可能な値が、switch ケースの 1 つと一致する必要があります。 考えられるすべての値にケースを提供することが適切でない場合は、明示的に指定されていない値をカバーするデフォルトのケースを定義できます。 このデフォルトのケースはdefaultのキーワードによって示され、常に最後に表示される必要があります。
This example uses a switch statement to consider a single lowercase character called someCharacter:
この例では、switch ステートメントを使用して、someCharacter という単一の小文字を考慮します。
let someCharacter: Character = "z"
switch someCharacter {
case "a":
    print("The first letter of the Latin alphabet")
case "z":
    print("The last letter of the Latin alphabet")
default:
    print("Some other character")
}
// Prints "The last letter of the Latin alphabet"
The switch statement’s first case matches the first letter of the English alphabet, a, and its second case matches the last letter, z. Because the switch must have a case for every possible character, not just every alphabetic character, this switch statement uses a default case to match all characters other than a and z. This provision ensures that the switch statement is exhaustive.
switch ステートメントの最初のケースは英語のアルファベットの最初の文字「a」に一致し、2 番目のケースは最後の文字「z」に一致します。 スイッチでは、すべてのアルファベット文字だけでなく、考えられるすべての文字に対して大文字と小文字を区別する必要があるため、この switch ステートメントはdefaultの大文字と小文字を使用して、a と z 以外のすべての文字に一致します。 この規定により、switch ステートメントが網羅的になることが保証されます。
Like if statements, switch statements also have an expression form:
if ステートメントと同様に、switch ステートメントにも式形式があります。
let anotherCharacter: Character = "a"
let message = switch anotherCharacter {
case "a":
    "The first letter of the Latin alphabet"
case "z":
    "The last letter of the Latin alphabet"
default:
    "Some other character"
}


print(message)
// Prints "The first letter of the Latin alphabet"
In this example, each case in the switch expression contains the value for message to be used when that case matches anotherCharacter. Because switch is always exhaustive, there is always a value to assign.
この例では、switch 式の各ケースには、そのケースが anotherCharacter と一致する場合に使用される message の値が含まれています。 switchは常に網羅的であるため、割り当てる値が常に存在します。
As with if expressions, you can throw an error or call a function like fatalError(_:file:line:) that never returns instead of providing a value for a given case. You can use switch expressions on the right-hand side of an assignment, as shown in the example above, and as the value that a function or closure returns.
if 式と同様に、特定のケースに値を提供する代わりに、エラーをスローしたり、返されない FatalError(_:file:line:) のような関数を呼び出したりすることができます。 上記の例に示すように、switch 式は代入の右側で、関数またはクロージャが返す値として使用できます。
No Implicit Fallthrough
暗黙的なフォールスルーなし
In contrast with switch statements in C and Objective-C, switch statements in Swift don’t fall through the bottom of each case and into the next one by default. Instead, the entire switch statement finishes its execution as soon as the first matching switch case is completed, without requiring an explicit break statement. This makes the switch statement safer and easier to use than the one in C and avoids executing more than one switch case by mistake.
C や Objective-C の switch ステートメントとは対照的に、Swift の switch ステートメントはデフォルトで各ケースの最後から次のケースに落ちません。 代わりに、明示的な break ステートメントを必要とせず、最初に一致する switch ケースが完了するとすぐに switch ステートメント全体の実行が終了します。 これにより、switch ステートメントは C のステートメントよりも安全かつ使いやすくなり、誤って複数の switch ケースが実行されることがなくなります。
Note
注釈
Although break isn’t required in Swift, you can use a break statement to match and ignore a particular case or to break out of a matched case before that case has completed its execution. For details, see Break in a Switch Statement.
Swift では break は必須ではありませんが、break ステートメントを使用すると、特定のケースに一致して無視したり、一致したケースの実行が完了する前にそのケースから抜け出すことができます。 詳細については、「Switch ステートメントの中断」を参照してください。
The body of each case must contain at least one executable statement. It isn’t valid to write the following code, because the first case is empty:
各ケースの本文には、少なくとも 1 つの実行可能なステートメントが含まれている必要があります。 最初のケースが空であるため、次のコードを記述することは無効です。
let anotherCharacter: Character = "a"
switch anotherCharacter {
case "a": // Invalid, the case has an empty body
case "A":
    print("The letter A")
default:
    print("Not the letter A")
}
// This will report a compile-time error.
Unlike a switch statement in C, this switch statement doesn’t match both "a" and "A". Rather, it reports a compile-time error that case "a": doesn’t contain any executable statements. This approach avoids accidental fallthrough from one case to another and makes for safer code that’s clearer in its intent.
C の switch ステートメントとは異なり、この switch ステートメントは"a"と"A"の両方に一致しません。 むしろ、case "a": に実行可能なステートメントが含まれていないというコンパイル時エラーが報告されます。 このアプローチにより、あるケースから別のケースへの偶発的なフォールスルーが回避され、意図がより明確で安全なコードが作成されます。
To make a switch with a single case that matches both "a" and "A", combine the two values into a compound case, separating the values with commas.
"a"と"A"の両方に一致する 1 つのケースでswitchを行うには、2 つの値をカンマで区切って複合ケースに結合します。
let anotherCharacter: Character = "a"
switch anotherCharacter {
case "a", "A":
    print("The letter A")
default:
    print("Not the letter A")
}
// Prints "The letter A"
For readability, a compound case can also be written over multiple lines. For more information about compound cases, see Compound Cases.
読みやすくするために、複合ケースを複数行にわたって記述することもできます。 複合ケースの詳細については、「複合ケース」をご覧ください。
Note
注釈
To explicitly fall through at the end of a particular switch case, use the fallthrough keyword, as described in Fallthrough.
特定のswitchケースの終了時に明示的にフォールスルーするには、「フォールスルー」で説明されているように、fallthroughキーワードを使用します。
Interval Matching
インターバルマッチング
Values in switch cases can be checked for their inclusion in an interval. This example uses number intervals to provide a natural-language count for numbers of any size:
switchケースの値が間隔に含まれているかどうかを確認できます。 この例では、数値間隔を使用して、任意のサイズの数値の自然言語カウントを提供します。
let approximateCount = 62
let countedThings = "moons orbiting Saturn"
let naturalCount: String
switch approximateCount {
case 0:
    naturalCount = "no"
case 1..<5:
    naturalCount = "a few"
case 5..<12:
    naturalCount = "several"
case 12..<100:
    naturalCount = "dozens of"
case 100..<1000:
    naturalCount = "hundreds of"
default:
    naturalCount = "many"
}
print("There are \(naturalCount) \(countedThings).")
// Prints "There are dozens of moons orbiting Saturn."
In the above example, approximateCount is evaluated in a switch statement. Each case compares that value to a number or interval. Because the value of approximateCount falls between 12 and 100, naturalCount is assigned the value "dozens of", and execution is transferred out of the switch statement.
上の例では、estimateCount が switch ステートメントで評価されます。 各ケースでは、その値を数値または間隔と比較します。 estimatedCount の値は 12 から 100 の間にあるため、naturalCount には"dozens of"という値が割り当てられ、実行は switch ステートメントの外に転送されます。
Tuples
タプル
You can use tuples to test multiple values in the same switch statement. Each element of the tuple can be tested against a different value or interval of values. Alternatively, use the underscore character (_), also known as the wildcard pattern, to match any possible value.
タプルを使用すると、同じ switch ステートメントで複数の値をテストできます。 タプルの各要素は、異なる値または値の間隔に対してテストできます。 あるいは、ワイルドカード パターンとも呼ばれるアンダースコア文字 (_) を使用して、可能な値と一致させます。
The example below takes an (x, y) point, expressed as a simple tuple of type (Int, Int), and categorizes it on the graph that follows the example.
以下の例では、(Int, Int) 型の単純なタプルとして表現される (x, y) 点を取得し、例に続くグラフ上でそれを分類します。
let somePoint = (1, 1)
switch somePoint {
case (0, 0):
    print("\(somePoint) is at the origin")
case (_, 0):
    print("\(somePoint) is on the x-axis")
case (0, _):
    print("\(somePoint) is on the y-axis")
case (-2...2, -2...2):
    print("\(somePoint) is inside the box")
default:
    print("\(somePoint) is outside of the box")
}
// Prints "(1, 1) is inside the box"
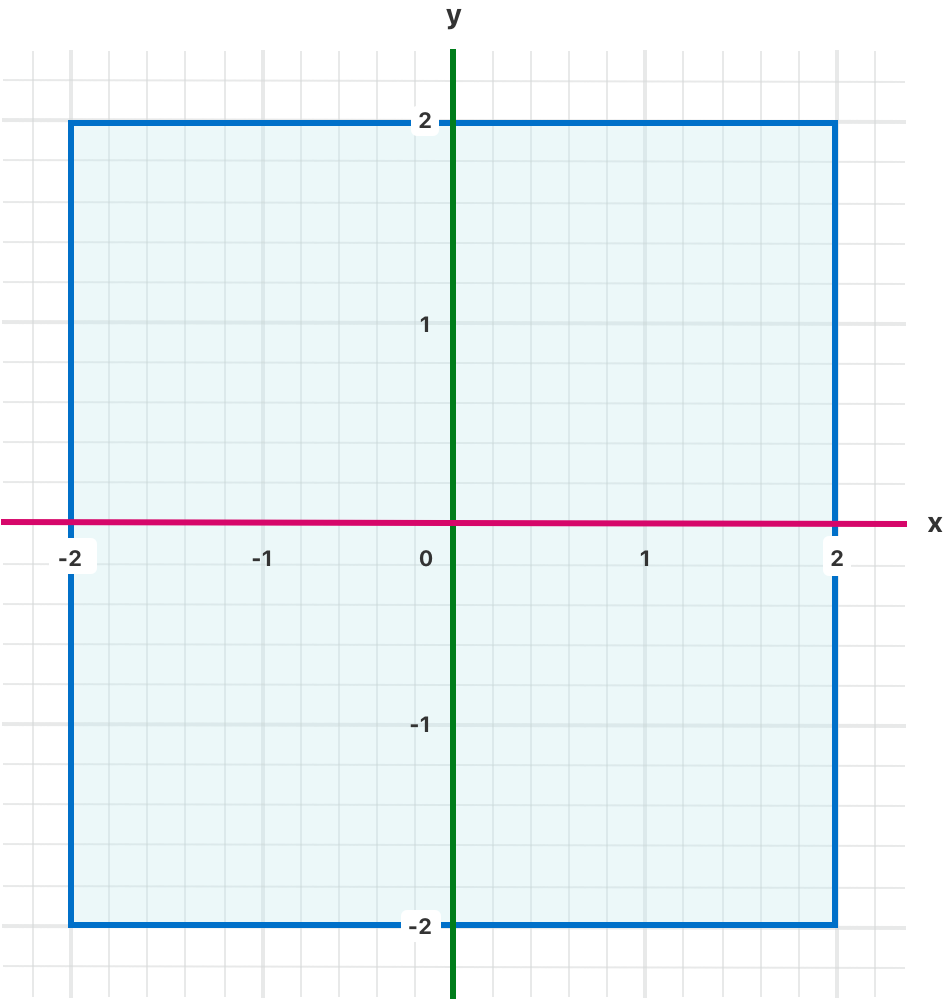
The switch statement determines whether the point is at the origin (0, 0), on the red x-axis, on the green y-axis, inside the blue 4-by-4 box centered on the origin, or outside of the box.
switch ステートメントは、点が原点 (0, 0)、赤色の X 軸上、緑色の Y 軸上、原点を中心とする青色の 4 × 4 ボックスの内側、またはボックスの外側にあるかどうかを決定します。 。
Unlike C, Swift allows multiple switch cases to consider the same value or values. In fact, the point (0, 0) could match all four of the cases in this example. However, if multiple matches are possible, the first matching case is always used. The point (0, 0) would match case (0, 0) first, and so all other matching cases would be ignored.
C とは異なり、Swift では複数の切り替えケースが同じ値とみなされることができます。 実際、点 (0, 0) は、この例の 4 つのケースすべてに一致する可能性があります。 ただし、複数の一致が可能な場合は、最初に一致したケースが常に使用されます。 ポイント (0, 0) は最初にケース (0, 0) に一致するため、一致する他のすべてのケースは無視されます。
Value Bindings
値のバインディング
A switch case can name the value or values it matches to temporary constants or variables, for use in the body of the case. This behavior is known as value binding, because the values are bound to temporary constants or variables within the case’s body.
switchケースでは、ケースの本文で使用するために、一時的な定数または変数に一致する値に名前を付けることができます。 値はケース本体内の一時的な定数または変数にバインドされるため、この動作は値バインディングとして知られています。
The example below takes an (x, y) point, expressed as a tuple of type (Int, Int), and categorizes it on the graph that follows:
以下の例では、タイプ (Int, Int) のタプルとして表現される (x, y) 点を取得し、それを次のグラフで分類します。
let anotherPoint = (2, 0)
switch anotherPoint {
case (let x, 0):
    print("on the x-axis with an x value of \(x)")
case (0, let y):
    print("on the y-axis with a y value of \(y)")
case let (x, y):
    print("somewhere else at (\(x), \(y))")
}
// Prints "on the x-axis with an x value of 2"
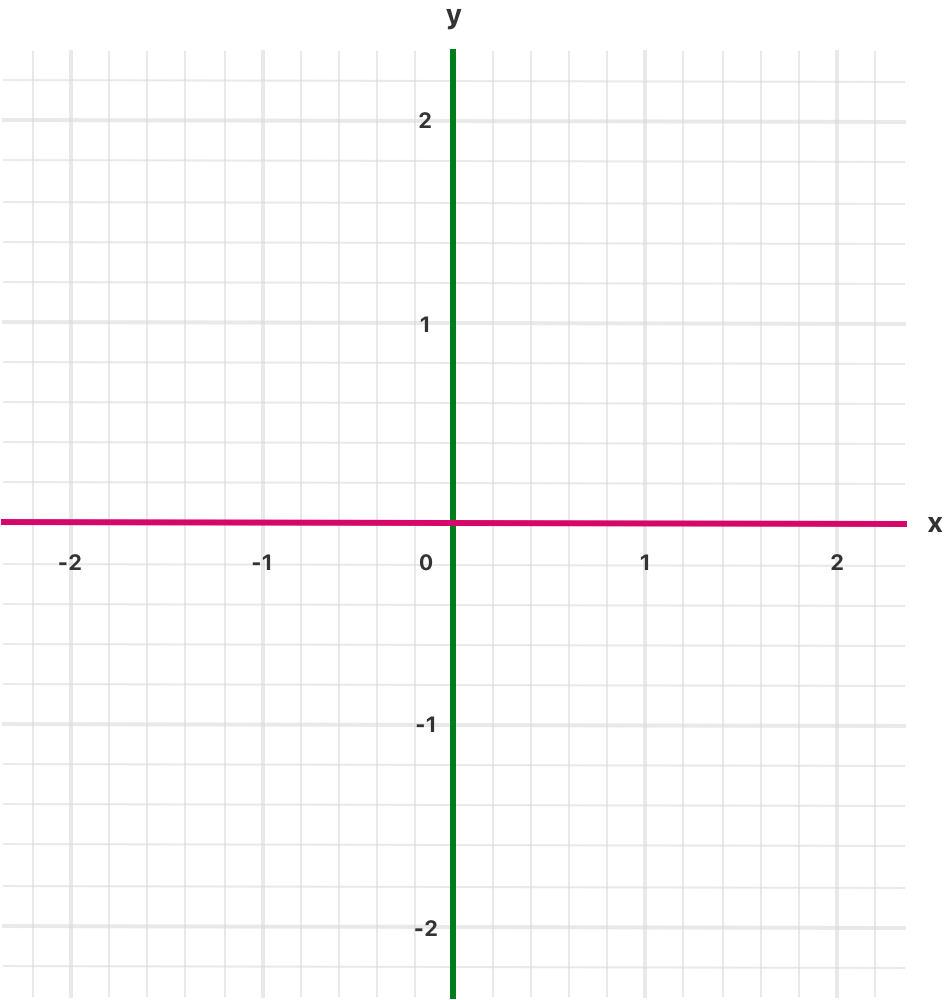
The switch statement determines whether the point is on the red x-axis, on the green y-axis, or elsewhere (on neither axis).
switch ステートメントは、ポイントが赤色の x 軸上にあるのか、緑色の y 軸上にあるのか、あるいは他の場所(どちらの軸にもない)にあるかを決定します。
The three switch cases declare placeholder constants x and y, which temporarily take on one or both tuple values from anotherPoint. The first case, case (let x, 0), matches any point with a y value of 0 and assigns the point’s x value to the temporary constant x. Similarly, the second case, case (0, let y), matches any point with an x value of 0 and assigns the point’s y value to the temporary constant y.
3 つのswitch ケースでは、プレースホルダ定数 x と y を宣言し、anotherPoint から一方または両方のタプル値を一時的に受け取ります。 最初のケース、case (let x, 0) は、y 値が 0 の任意の点と一致し、点の x 値を一時定数 x に割り当てます。 同様に、2 番目のケース case (0, let y) は、x 値が 0 の任意の点と一致し、点の y 値を一時定数 y に割り当てます。
After the temporary constants are declared, they can be used within the case’s code block. Here, they’re used to print the categorization of the point.
一時定数を宣言すると、ケースのコード ブロック内で使用できるようになります。 ここでは、ポイントの分類を印刷するために使用されます。
This switch statement doesn’t have a default case. The final case, case let (x, y), declares a tuple of two placeholder constants that can match any value. Because anotherPoint is always a tuple of two values, this case matches all possible remaining values, and a default case isn’t needed to make the switch statement exhaustive.
この switch ステートメントにはデフォルトのケースがありません。 最後のケース case let (x, y) は、任意の値に一致する 2 つのプレースホルダー定数のタプルを宣言します。 anotherPoint は常に 2 つの値のタプルであるため、このケースは残りのすべての可能な値と一致し、switch ステートメントを網羅するためにデフォルトのケースは必要ありません。
Where
どこ
A switch case can use a where clause to check for additional conditions.
switchケースでは、where 句を使用して追加の条件を確認できます。
The example below categorizes an (x, y) point on the following graph:
以下の例では、次のグラフ上の (x, y) 点を分類します。
let yetAnotherPoint = (1, -1)
switch yetAnotherPoint {
case let (x, y) where x == y:
    print("(\(x), \(y)) is on the line x == y")
case let (x, y) where x == -y:
    print("(\(x), \(y)) is on the line x == -y")
case let (x, y):
    print("(\(x), \(y)) is just some arbitrary point")
}
// Prints "(1, -1) is on the line x == -y"
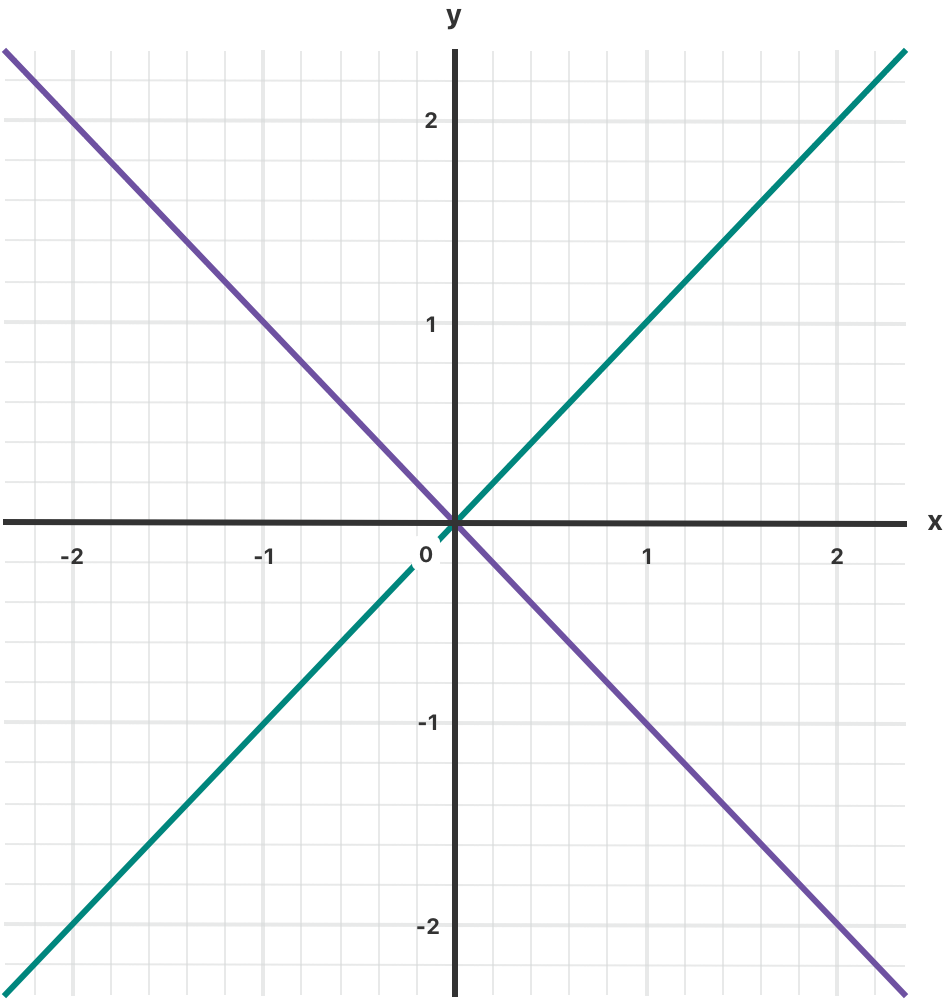
The switch statement determines whether the point is on the green diagonal line where x == y, on the purple diagonal line where x == -y, or neither.
switch ステートメントは、点が x == y の緑の対角線上にあるか、x == -y の紫の対角線上にあるか、またはそのどちらでもないかを決定します。
The three switch cases declare placeholder constants x and y, which temporarily take on the two tuple values from yetAnotherPoint. These constants are used as part of a where clause, to create a dynamic filter. The switch case matches the current value of point only if the where clause’s condition evaluates to true for that value.
3 つのswitch ケースは、yetAnotherPoint の 2 つのタプル値を一時的に受け取るプレースホルダー定数 x と y を宣言します。 これらの定数は、動的フィルタを作成するために where 句の一部として使用されます。 switch case は、where 句の条件がその値に対して true と評価された場合にのみ、point の現在の値と一致します。
As in the previous example, the final case matches all possible remaining values, and so a default case isn’t needed to make the switch statement exhaustive.
前の例と同様に、最後のケースは残りのすべての可能な値と一致するため、switch ステートメントを網羅するためにdefaultのケースは必要ありません。
Compound Cases
複合ケース
Multiple switch cases that share the same body can be combined by writing several patterns after case, with a comma between each of the patterns. If any of the patterns match, then the case is considered to match. The patterns can be written over multiple lines if the list is long. For example:
同じ本体を共有する複数のスイッチケースは、caseの後に複数のパターンを記述し、各パターンの間にカンマを入れることで組み合わせることができます。 いずれかのパターンが一致する場合、そのケースは一致するとみなされます。 リストが長い場合は、パターンを複数行に渡って記述することができます。 例えば:
let someCharacter: Character = "e"
switch someCharacter {
case "a", "e", "i", "o", "u":
    print("\(someCharacter) is a vowel")
case "b", "c", "d", "f", "g", "h", "j", "k", "l", "m",
    "n", "p", "q", "r", "s", "t", "v", "w", "x", "y", "z":
    print("\(someCharacter) is a consonant")
default:
    print("\(someCharacter) isn't a vowel or a consonant")
}
// Prints "e is a vowel"
The switch statement’s first case matches all five lowercase vowels in the English language. Similarly, its second case matches all lowercase English consonants. Finally, the default case matches any other character.
switch ステートメントの最初のケースは、英語の小文字の 5 つの母音すべてと一致します。 同様に、2 番目のケースはすべての小文字の英語の子音に一致します。 最後に、defaultの大文字と小文字は他の文字と一致します。
Compound cases can also include value bindings. All of the patterns of a compound case have to include the same set of value bindings, and each binding has to get a value of the same type from all of the patterns in the compound case. This ensures that, no matter which part of the compound case matched, the code in the body of the case can always access a value for the bindings and that the value always has the same type.
複合ケースには値バインディングを含めることもできます。 複合ケースのすべてのパターンには同じ値バインディングのセットが含まれている必要があり、各バインディングは複合ケースのすべてのパターンから同じ型の値を取得する必要があります。 これにより、複合ケースのどの部分が一致しても、ケース本体のコードは常にバインディングの値にアクセスでき、その値の型が常に同じであることが保証されます。
let stillAnotherPoint = (9, 0)
switch stillAnotherPoint {
case (let distance, 0), (0, let distance):
    print("On an axis, \(distance) from the origin")
default:
    print("Not on an axis")
}
// Prints "On an axis, 9 from the origin"
The case above has two patterns: (let distance, 0) matches points on the x-axis and (0, let distance) matches points on the y-axis. Both patterns include a binding for distance and distance is an integer in both patterns — which means that the code in the body of the case can always access a value for distance.
上記のケースには 2 つのパターンがあります: (let distance, 0) は x 軸上の点と一致し、(0, let distance) は y 軸上の点と一致します。 どちらのパターンにもdistanceのバインディングが含まれており、どちらのパターンでもdistanceは整数です。これは、case本体のコードがいつでもdistanceの値にアクセスできることを意味します。
Patterns
パターン
In the previous examples, each switch case includes a pattern that indicates what values match that case. You can also use a pattern as the condition for an if statement. Here’s what that looks like:
前の例では、各スイッチケースに、そのケースに一致する値を示すパターンが含まれています。パターンはif文の条件として使用することもできます。その例を以下に示します。
let somePoint = (12, 100)
if case (let x, 100) = somePoint {
    print("Found a point on the y=100 line, at \(x)")
}
// Prints "Found a point on the y=100 line, at 12"
In this code, the condition for the if statement starts with case, indicating that the condition is a pattern instead of a Boolean value. If the pattern matches, then the condition for the if is considered to be true, and so the code in the body of the if statement runs. The patterns you can write after if case are the same as the patterns you can write in a switch case.
このコードでは、if文の条件がcaseで始まっており、これは条件がブール値ではなくパターンであることを示しています。パターンが一致すると、if文の条件は真とみなされ、if文の本体のコードが実行されます。if caseの後に記述できるパターンは、switch caseに記述できるパターンと同じです。
In a for–in loop, you can give names to parts of the value using a value binding pattern, even without writing case in your code:
for-in ループでは、コードに case を記述しなくても、値バインディング パターンを使用して値の一部に名前を付けることができます。
let points = [(10, 0), (30, -30), (-20, 0)]


for (x, y) in points {
    if y == 0 {
        print("Found a point on the x-axis at \(x)")
    }
}
// Prints "Found a point on the x-axis at 10"
// Prints "Found a point on the x-axis at -20"
The for–in loop above iterates over an array of tuples, binding the first and second elements of the tuples to the x and y constants. The statements inside the loop can use those constants, such as the if statement that checks whether the point lies on the x-axis. A more concise way to write this code is to combine the value bindings and condition using a for–case–in loop. The code below has the same behavior as the for–in loop above:
上記の for-in ループはタプルの配列を反復処理し、タプルの 1 番目と 2 番目の要素を x 定数と y 定数にバインドします。ループ内のステートメントでは、点が x 軸上にあるかどうかを確認する if ステートメントなど、これらの定数を使用できます。このコードをより簡潔に記述するには、値のバインドと条件を for-case-in ループで組み合わせます。以下のコードは、上記の for-in ループと同じ動作をします。
for case (let x, 0) in points {
    print("Found a point on the x-axis at \(x)")
}
// Prints "Found a point on the x-axis at 10"
// Prints "Found a point on the x-axis at -20"
In this code, the condition is integrated into the for–case–in loop as part of the pattern. The statements in the for–case–in loop run only for points on the x-axis. This code produces the same result as the for–in loop above, but is a more compact way to iterate over only certain elements in a collection.
このコードでは、条件がパターンの一部として for-case-in ループに統合されています。for-case-in ループ内のステートメントは、x軸上の点に対してのみ実行されます。このコードは上記の for-in ループと同じ結果を生成しますが、コレクション内の特定の要素のみを反復処理するよりコンパクトな方法です。
A for–case–in loop can also include a where clause, to check for an additional condition. The statements inside the loop run only when where clause matches the current element. For example:
for-case-in ループには where 句を含めることで、追加の条件をチェックすることもできます。ループ内の文は、where 句が現在の要素と一致した場合にのみ実行されます。例:
for case let (x, y) in points where x == y || x == -y  {
    print("Found (\(x), \(y)) along a line through the origin")
}
// Prints "Found (30, -30) along a line through the origin"
This code binds the first and second elements of the tuple to x and y as constants, and then checks their values in the where clause. If the where clause is true, then the code in the body of the for loop runs; otherwise, iteration continues with the next element.
このコードは、タプルの1番目と2番目の要素を定数としてxとyにバインドし、where句でそれらの値をチェックします。where句がtrueの場合、forループ本体のコードが実行され、そうでない場合は次の要素で反復処理が続行されます。
Because patterns can bind values, if–case statements and for–case–in loops are useful for working with enumerations that have associated values, as described in Associated Values.
パターンは値をバインドできるため、関連付けられた値で説明されているように、関連付けられた値を持つ列挙体を操作するには、if-case ステートメントと for-case-in ループが便利です。
Control Transfer Statements
制御転送ステートメント
Control transfer statements change the order in which your code is executed, by transferring control from one piece of code to another. Swift has five control transfer statements:
制御転送ステートメントは、あるコードから別のコードに制御を転送することにより、コードの実行順序を変更します。 Swift には 5 つの制御転送ステートメントがあります。
continue- 続く
break- 中断
fallthrough- 落ちる
return- 戻る
throw- 投げる
The continue, break, and fallthrough statements are described below. The return statement is described in Functions, and the throw statement is described in Propagating Errors Using Throwing Functions.
continue、break、fallthrough ステートメントについては以下で説明します。 return ステートメントについては「関数」で説明され、throw ステートメントについては「 スロー関数を使用したエラーの伝播」で説明されています。
Continue
続く
The continue statement tells a loop to stop what it’s doing and start again at the beginning of the next iteration through the loop. It says “I am done with the current loop iteration” without leaving the loop altogether.
continue ステートメントは、実行中の処理を停止し、ループの次の反復の開始時に再開するようにループに指示します。 ループから完全に離れることなく、「現在のループの反復が終了しました」と表示されます。
The following example removes all vowels and spaces from a lowercase string to create a cryptic puzzle phrase:
次の例では、小文字の文字列からすべての母音とスペースを削除して、謎めいたパズル フレーズを作成します。
let puzzleInput = "great minds think alike"
var puzzleOutput = ""
let charactersToRemove: [Character] = ["a", "e", "i", "o", "u", " "]
for character in puzzleInput {
    if charactersToRemove.contains(character) {
        continue
    }
    puzzleOutput.append(character)
}
print(puzzleOutput)
// Prints "grtmndsthnklk"
The code above calls the continue keyword whenever it matches a vowel or a space, causing the current iteration of the loop to end immediately and to jump straight to the start of the next iteration.
上記のコードは、母音またはスペースに一致するたびに continue キーワードを呼び出します。これにより、ループの現在の反復が直ちに終了し、次の反復の開始に直接ジャンプします。
Break
中断
The break statement ends execution of an entire control flow statement immediately. The break statement can be used inside a switch or loop statement when you want to terminate the execution of the switch or loop statement earlier than would otherwise be the case.
break ステートメントは、制御フロー ステートメント全体の実行を直ちに終了します。 switch ステートメントまたはloop ステートメントの実行を通常よりも早く終了したい場合、break ステートメントを switch ステートメントまたはloop ステートメント内で使用できます。
Break in a Loop Statement
ループステートメントの中断
When used inside a loop statement, break ends the loop’s execution immediately and transfers control to the code after the loop’s closing brace (}). No further code from the current iteration of the loop is executed, and no further iterations of the loop are started.
ループ ステートメント内で使用すると、break はループの実行を直ちに終了し、ループの閉じ中括弧 (}) の後のコードに制御を移します。 ループの現在の反復からのそれ以上のコードは実行されず、ループのさらなる反復は開始されません。
Break in a Switch Statement
Switch ステートメントの中断
When used inside a switch statement, break causes the switch statement to end its execution immediately and to transfer control to the code after the switch statement’s closing brace (}).
switch ステートメント内で使用すると、break を使用すると、switch ステートメントの実行が即座に終了し、switch ステートメントの閉じ中括弧(})の後のコードに制御が移ります。
This behavior can be used to match and ignore one or more cases in a switch statement. Because Swift’s switch statement is exhaustive and doesn’t allow empty cases, it’s sometimes necessary to deliberately match and ignore a case in order to make your intentions explicit. You do this by writing the break statement as the entire body of the case you want to ignore. When that case is matched by the switch statement, the break statement inside the case ends the switch statement’s execution immediately.
この動作を使用して、switch ステートメント内の 1 つ以上のケースを一致させたり無視したりすることができます。 Swift の switch ステートメントは網羅的であり、空のケースを許可しないため、意図を明示するためにケースを意図的に一致させて無視する必要がある場合があります。 これを行うには、無視するケースの本文全体として中断ステートメントを記述します。 そのケースが switch ステートメントと一致すると、ケース内の break ステートメントによって switch ステートメントの実行が直ちに終了します。
Note
注釈
A switch case that contains only a comment is reported as a compile-time error. Comments aren’t statements and don’t cause a switch case to be ignored. Always use a break statement to ignore a switch case.
コメントのみを含む switch ケースはコンパイル時エラーとして報告されます。 コメントはステートメントではないため、switch ケースが無視されることはありません。 switch ケースを無視するには、常に break ステートメントを使用してください。
The following example switches on a Character value and determines whether it represents a number symbol in one of four languages. For brevity, multiple values are covered in a single switch case.
次の例では、Character 値をオンにして、それが 4 つの言語のいずれかの数字記号を表すかどうかを判断します。 簡潔にするために、複数の値が 1 つのスイッチケースでカバーされます。
let numberSymbol: Character = "三"  // Chinese symbol for the number 3
var possibleIntegerValue: Int?
switch numberSymbol {
case "1", "١", "一", "๑":
    possibleIntegerValue = 1
case "2", "٢", "二", "๒":
    possibleIntegerValue = 2
case "3", "٣", "三", "๓":
    possibleIntegerValue = 3
case "4", "٤", "四", "๔":
    possibleIntegerValue = 4
default:
    break
}
if let integerValue = possibleIntegerValue {
    print("The integer value of \(numberSymbol) is \(integerValue).")
} else {
    print("An integer value couldn't be found for \(numberSymbol).")
}
// Prints "The integer value of 三 is 3."
This example checks numberSymbol to determine whether it’s a Latin, Arabic, Chinese, or Thai symbol for the numbers 1 to 4. If a match is found, one of the switch statement’s cases sets an optional Int? variable called possibleIntegerValue to an appropriate integer value.
この例では、numberSymbol をチェックして、1 ~ 4 の数字がラテン語、アラビア語、中国語、またはタイ語の記号であるかどうかを判断します。一致するものが見つかった場合、switch ステートメントのケースの 1 つでオプションの Int? が設定されます。 possibleIntegerValueという変数を適切な整数値に置き換えます。
After the switch statement completes its execution, the example uses optional binding to determine whether a value was found. The possibleIntegerValue variable has an implicit initial value of nil by virtue of being an optional type, and so the optional binding will succeed only if possibleIntegerValue was set to an actual value by one of the switch statement’s first four cases.
switch ステートメントの実行が完了した後、この例ではオプションのバインディングを使用して値が見つかったかどうかを判断します。 possibleIntegerValue変数はオプションの型であるため、暗黙の初期値nilを持っています。そのため、switchステートメントの最初の4つのケースのいずれかによってpossibleIntegerValueが実際の値に設定された場合にのみオプションのバインディングが成功します。
Because it’s not practical to list every possible Character value in the example above, a default case handles any characters that aren’t matched. This default case doesn’t need to perform any action, and so it’s written with a single break statement as its body. As soon as the default case is matched, the break statement ends the switch statement’s execution, and code execution continues from the if let statement.
上記の例で考えられるすべてのCharacter値をリストすることは現実的ではないため、一致しない文字はdefaultのケースで処理されます。 このdefaultのケースはアクションを実行する必要がないため、本体として 1 つの break ステートメントを使用して作成されます。 defaultのケースが一致するとすぐに、break ステートメントは switch ステートメントの実行を終了し、コードの実行は if let ステートメントから継続されます。
Fallthrough
落ちる
In Swift, switch statements don’t fall through the bottom of each case and into the next one. That is, the entire switch statement completes its execution as soon as the first matching case is completed. By contrast, C requires you to insert an explicit break statement at the end of every switch case to prevent fallthrough. Avoiding default fallthrough means that Swift switch statements are much more concise and predictable than their counterparts in C, and thus they avoid executing multiple switch cases by mistake.
Swift では、switch ステートメントが各ケースの最後から次のケースに入るわけではありません。 つまり、最初に一致するケースが完了するとすぐに、switch ステートメント全体の実行が完了します。 対照的に、C では、フォールスルーを防ぐために、すべての切り替えケースの最後に明示的な break ステートメントを挿入する必要があります。 デフォルトのフォールスルーを回避するということは、Swift の switch ステートメントが C の対応するステートメントよりもはるかに簡潔で予測可能であるため、複数の switch ケースが誤って実行されることを回避できることを意味します。
If you need C-style fallthrough behavior, you can opt in to this behavior on a case-by-case basis with the fallthrough keyword. The example below uses fallthrough to create a textual description of a number.
C スタイルのフォールスルー動作が必要な場合は、フォールスルー キーワードを使用して、ケースバイケースでこの動作をオプトインできます。 以下の例では、フォールスルーを使用して数値のテキスト説明を作成しています。
let integerToDescribe = 5
var description = "The number \(integerToDescribe) is"
switch integerToDescribe {
case 2, 3, 5, 7, 11, 13, 17, 19:
    description += " a prime number, and also"
    fallthrough
default:
    description += " an integer."
}
print(description)
// Prints "The number 5 is a prime number, and also an integer."
This example declares a new String variable called description and assigns it an initial value. The function then considers the value of integerToDescribe using a switch statement. If the value of integerToDescribe is one of the prime numbers in the list, the function appends text to the end of description, to note that the number is prime. It then uses the fallthrough keyword to “fall into” the default case as well. The default case adds some extra text to the end of the description, and the switch statement is complete.
この例では、description という新しいString変数を宣言し、それに初期値を割り当てます。 次に、関数は switch ステートメントを使用して integerToDescribe の値を考慮します。 integerToDescribe の値がリスト内の素数の 1 つである場合、関数は説明の最後にテキストを追加して、その数値が素数であることを示します。 次に、fallthrough キーワードを使用して、defaultのケースにも「該当」させます。 defaultのケースでは、説明の最後に追加のテキストが追加され、switch ステートメントが完成します。
Unless the value of integerToDescribe is in the list of known prime numbers, it isn’t matched by the first switch case at all. Because there are no other specific cases, integerToDescribe is matched by the default case.
integerToDescribe の値が既知の素数のリストに含まれていない限り、最初の switch ケースとはまったく一致しません。 他に特定のケースがないため、integerToDescribe はdefaultのケースと一致します。
After the switch statement has finished executing, the number’s description is printed using the print(_:separator:terminator:) function. In this example, the number 5 is correctly identified as a prime number.
switch ステートメントの実行が完了すると、print(_:separator:terminator:) 関数を使用して番号の説明が出力されます。 この例では、数字 5 が素数として正しく識別されます。
Note
注釈
The fallthrough keyword doesn’t check the case conditions for the switch case that it causes execution to fall into. The fallthrough keyword simply causes code execution to move directly to the statements inside the next case (or default case) block, as in C’s standard switch statement behavior.
fallthrough キーワードは、実行の原因となる切り替えケースのケース条件をチェックしません。 fallthrough キーワードは、C の標準の switch ステートメントの動作と同様に、コードの実行を次の ケース (またはdefaultの ケース) ブロック内のステートメントに直接移動させるだけです。
Labeled Statements
ラベル付きステートメント
In Swift, you can nest loops and conditional statements inside other loops and conditional statements to create complex control flow structures. However, loops and conditional statements can both use the break statement to end their execution prematurely. Therefore, it’s sometimes useful to be explicit about which loop or conditional statement you want a break statement to terminate. Similarly, if you have multiple nested loops, it can be useful to be explicit about which loop the continue statement should affect.
Swift では、ループや条件ステートメントを他のループや条件ステートメント内にネストして、複雑な制御フロー構造を作成できます。 ただし、ループと条件ステートメントは両方とも、break ステートメントを使用して実行を途中で終了することができます。 したがって、break ステートメントで終了するループまたは条件ステートメントを明示的に指定すると便利な場合があります。 同様に、複数のネストされたループがある場合、continue ステートメントがどのループに影響を与えるかを明示的に指定すると便利です。
To achieve these aims, you can mark a loop statement or conditional statement with a statement label. With a conditional statement, you can use a statement label with the break statement to end the execution of the labeled statement. With a loop statement, you can use a statement label with the break or continue statement to end or continue the execution of the labeled statement.
これらの目的を達成するには、ループ ステートメントまたは条件ステートメントにステートメント ラベルを付けることができます。 条件付きステートメントでは、break ステートメントとともにステートメント ラベルを使用して、ラベル付きステートメントの実行を終了できます。 ループ ステートメントでは、ステートメント ラベルと break ステートメントまたは continue ステートメントを使用して、ラベル付きステートメントの実行を終了または続行できます。
A labeled statement is indicated by placing a label on the same line as the statement’s introducer keyword, followed by a colon. Here’s an example of this syntax for a while loop, although the principle is the same for all loops and switch statements:
ラベル付きステートメントは、ステートメントの導入キーワードと同じ行にラベルを配置し、その後にコロンを付けることによって示されます。 以下は while ループの構文の例ですが、原則はすべてのループと switch ステートメントで同じです。
<#label name#>: while <#condition#> {
   <#statements#>
}
The following example uses the break and continue statements with a labeled while loop for an adapted version of the Snakes and Ladders game that you saw earlier in this chapter. This time around, the game has an extra rule:
次の例では、この章の前半で説明した「Snakes and Ladders」ゲームの適応バージョンに対して、ラベル付きの while ループを使用して、break ステートメントと continue ステートメントを使用しています。 今回のゲームには追加ルールがあります。
- To win, you must land exactly on square 25.
- 勝つには、正確に 25 マス目に着地する必要があります。
If a particular dice roll would take you beyond square 25, you must roll again until you roll the exact number needed to land on square 25.
特定のサイコロを振ってマス目 25 を超えてしまう場合は、マス目 25 に到達するのに必要な正確な数が出るまで、もう一度サイコロを振る必要があります。
The game board is the same as before.
ゲーム盤は以前と同じです。
The values of finalSquare, board, square, and diceRoll are initialized in the same way as before:
FinalSquare、board、square、diceRoll の値は、以前と同じ方法で初期化されます。
let finalSquare = 25
var board = [Int](repeating: 0, count: finalSquare + 1)
board[03] = +08; board[06] = +11; board[09] = +09; board[10] = +02
board[14] = -10; board[19] = -11; board[22] = -02; board[24] = -08
var square = 0
var diceRoll = 0
This version of the game uses a while loop and a switch statement to implement the game’s logic. The while loop has a statement label called gameLoop to indicate that it’s the main game loop for the Snakes and Ladders game.
このバージョンのゲームでは、while ループと switch ステートメントを使用してゲームのロジックを実装しています。 while ループには、gameLoop というステートメント ラベルがあり、これが Snakes and Ladders ゲームのメイン ゲーム ループであることを示します。
The while loop’s condition is while square != finalSquare, to reflect that you must land exactly on square 25.
while ループの条件は while square != FinalSquare であり、正方形 25 に正確に着地する必要があることを反映しています。
gameLoop: while square != finalSquare {
    diceRoll += 1
    if diceRoll == 7 { diceRoll = 1 }
    switch square + diceRoll {
    case finalSquare:
        // diceRoll will move us to the final square, so the game is over
        break gameLoop
    case let newSquare where newSquare > finalSquare:
        // diceRoll will move us beyond the final square, so roll again
        continue gameLoop
    default:
        // this is a valid move, so find out its effect
        square += diceRoll
        square += board[square]
    }
}
print("Game over!")
The dice is rolled at the start of each loop. Rather than moving the player immediately, the loop uses a switch statement to consider the result of the move and to determine whether the move is allowed:
各ループの開始時にサイコロが振られます。 ループはプレーヤーをすぐに移動するのではなく、switch ステートメントを使用して移動の結果を検討し、移動が許可されるかどうかを判断します。
- If the dice roll will move the player onto the final square, the game is over. The
break gameLoopstatement transfers control to the first line of code outside of thewhileloop, which ends the game. - サイコロの目でプレイヤーが最後のマス目に移動すると、ゲームは終了です。
break gameLoopステートメントは、whileループの外側のコードの最初の行に制御を移し、ゲームを終了します。 - If the dice roll will move the player beyond the final square, the move is invalid and the player needs to roll again. The
continue gameLoopstatement ends the currentwhileloop iteration and begins the next iteration of the loop. - サイコロのロールによってプレーヤーが最後の正方形を超えて移動する場合、その移動は無効となり、プレーヤーはもう一度サイコロを振る必要があります。
continue gameLoopステートメントは、現在のwhileループの反復を終了し、ループの次の反復を開始します。 - In all other cases, the dice roll is a valid move. The player moves forward by
diceRollsquares, and the game logic checks for any snakes and ladders. The loop then ends, and control returns to thewhilecondition to decide whether another turn is required. - それ以外のすべての場合、サイコロの目は有効な動きです。 プレーヤーは
diceRollのマス目ごとに前進し、ゲーム ロジックはヘビやはしごをチェックします。 その後、ループが終了し、制御はwhile条件に戻り、別のターンが必要かどうかを決定します。
Note
注釈
If the break statement above didn’t use the gameLoop label, it would break out of the switch statement, not the while statement. Using the gameLoop label makes it clear which control statement should be terminated.
上記の break ステートメントで gameLoop ラベルが使用されていない場合、while ステートメントではなく switch ステートメントから抜け出すことになります。 gameLoop ラベルを使用すると、どの制御ステートメントを終了する必要があるかが明確になります。
It isn’t strictly necessary to use the gameLoop label when calling continue gameLoop to jump to the next iteration of the loop. There’s only one loop in the game, and therefore no ambiguity as to which loop the continue statement will affect. However, there’s no harm in using the gameLoop label with the continue statement. Doing so is consistent with the label’s use alongside the break statement and helps make the game’s logic clearer to read and understand.
ループの次の反復にジャンプするために continue gameLoop を呼び出すときに、gameLoop ラベルを使用することは厳密には必要ありません。 ゲームにはループが 1 つだけあるため、Continue ステートメントがどのループに影響するかについてはあいまいさはありません。 ただし、gameLoop ラベルを continue ステートメントとともに使用しても問題はありません。 そうすることで、break ステートメントと並行してラベルを使用することと一致し、ゲームのロジックをより明確に読んで理解できるようになります。
Early Exit
早期退場
A guard statement, like an if statement, executes statements depending on the Boolean value of an expression. You use a guard statement to require that a condition must be true in order for the code after the guard statement to be executed. Unlike an if statement, a guard statement always has an else clause — the code inside the else clause is executed if the condition isn’t true.
guard ステートメントは、if ステートメントと同様に、式のブール値に応じてステートメントを実行します。 guard ステートメントを使用すると、guard ステートメントの後のコードが実行されるために条件が true でなければならないことを要求できます。 if ステートメントとは異なり、ガード ステートメントには常に else 節があり、条件が true でない場合、else 節内のコードが実行されます。
func greet(person: [String: String]) {
    guard let name = person["name"] else {
        return
    }


    print("Hello \(name)!")


    guard let location = person["location"] else {
        print("I hope the weather is nice near you.")
        return
    }


    print("I hope the weather is nice in \(location).")
}


greet(person: ["name": "John"])
// Prints "Hello John!"
// Prints "I hope the weather is nice near you."
greet(person: ["name": "Jane", "location": "Cupertino"])
// Prints "Hello Jane!"
// Prints "I hope the weather is nice in Cupertino."
If the guard statement’s condition is met, code execution continues after the guard statement’s closing brace. Any variables or constants that were assigned values using an optional binding as part of the condition are available for the rest of the code block that the guard statement appears in.
guard ステートメントの条件が満たされた場合、コードの実行はguard ステートメントの閉じ中括弧の後に続行されます。 条件の一部としてオプションのバインディングを使用して値が割り当てられた変数または定数は、guard ステートメントが含まれるコード ブロックの残りの部分で使用できます。
If that condition isn’t met, the code inside the else branch is executed. That branch must transfer control to exit the code block in which the guard statement appears. It can do this with a control transfer statement such as return, break, continue, or throw, or it can call a function or method that doesn’t return, such as fatalError(_:file:line:).
その条件が満たされない場合は、else ブランチ内のコードが実行されます。 そのブランチは、ガード ステートメントが出現するコード ブロックを終了するために制御を移す必要があります。 これは、return、break、 continue、throw などの制御転送ステートメントを使用して行うことも、fatalError(_:file:line:) などの返さない関数やメソッドを呼び出すこともできます。
Using a guard statement for requirements improves the readability of your code, compared to doing the same check with an if statement. It lets you write the code that’s typically executed without wrapping it in an else block, and it lets you keep the code that handles a violated requirement next to the requirement.
要件に対してguard ステートメントを使用すると、if ステートメントで同じチェックを行う場合と比較して、コードの可読性が向上します。 これにより、else ブロックでラップせずに通常実行されるコードを作成でき、違反した要件を処理するコードを要件の隣に保持できます。
Deferred Actions
遅延アクション
Unlike control-flow constructs like if and while, which let you control whether part of your code is executed or how many times it gets executed, defer controls when a piece of code is executed. You use a defer block to write code that will be executed later, when your program reaches the end of the current scope. For example:
コードの一部を実行するかどうか、または実行回数を制御できる if や while などの制御フロー構造とは異なり、コードの一部が実行されるときの制御は延期されます。 defer ブロックを使用して、後でプログラムが現在のスコープの終わりに達したときに実行されるコードを記述します。 例えば:
var score = 1
if score < 10 {
    defer {
        print(score)
    }
    score += 5
}
// Prints "6"
In the example above, the code inside of the defer block is executed before exiting the body of the if statement. First, the code in the if statement runs, which increments score by five. Then, before exiting the if statement’s scope, the deferred code is run, which prints score.
上の例では、if ステートメントの本文を終了する前に、defer ブロック内のコードが実行されます。 まず、if ステートメント内のコードが実行され、スコアが 5 ずつ増加します。 次に、if ステートメントのスコープを終了する前に、遅延コードが実行され、スコアが出力されます。
The code inside of the defer always runs, regardless of how the program exits that scope. That includes code like an early exit from a function, breaking out of a for loop, or throwing an error. This behavior makes defer useful for operations where you need to guarantee a pair of actions happen — like manually allocating and freeing memory, opening and closing low-level file descriptors, and beginning and ending transactions in a database — because you can write both actions next to each other in your code. For example, the following code gives a temporary bonus to the score, by adding and subtracting 100 inside a chunk of code:
defer 内のコードは、プログラムがそのスコープをどのように終了するかに関係なく、常に実行されます。 これには、関数の早期終了、for ループの抜け出し、エラーのスローなどのコードが含まれます。 この動作により、defer は、手動でのメモリの割り当てと解放、低レベルのファイル記述子の開閉、データベースでのトランザクションの開始と終了など、ペアのアクションの発生を保証する必要がある操作に役立ちます。これは、両方のアクションを次に記述できるためです。 コード内で相互に接続します。 たとえば、次のコードは、コードのチャンク内で 100 を加算および減算することにより、スコアに一時的なボーナスを与えます。
var score = 3
if score < 100 {
    score += 100
    defer {
        score -= 100
    }
    // Other code that uses the score with its bonus goes here.
    print(score)
}
// Prints "103"
If you write more than one defer block in the same scope, the first one you specify is the last one to run.
同じスコープ内に複数の defer ブロックを作成した場合、最初に指定したものが最後に実行されます。
if score < 10 {
    defer {
        print(score)
    }
    defer {
        print("The score is:")
    }
    score += 5
}
// Prints "The score is:"
// Prints "6"
If your program stops running — for example, because of a runtime error or a crash — deferred code doesn’t execute. However, deferred code does execute after an error is thrown; for information about using defer with error handling, see Specifying Cleanup Actions.
実行時エラーやクラッシュが原因でプログラムの実行が停止した場合、遅延コードは実行されません。 ただし、遅延コードはエラーがスローされた後に実行されます。 エラー処理での遅延の使用については、「クリーンアップ アクションの指定」を参照してください。
Checking API Availability
API の可用性を確認する
Swift has built-in support for checking API availability, which ensures that you don’t accidentally use APIs that are unavailable on a given deployment target.
Swift には、API の可用性を確認するためのサポートが組み込まれており、特定のデプロイメント ターゲットで使用できない API を誤って使用することがなくなります。
The compiler uses availability information in the SDK to verify that all of the APIs used in your code are available on the deployment target specified by your project. Swift reports an error at compile time if you try to use an API that isn’t available.
コンパイラーは、SDK 内の可用性情報を使用して、コードで使用されているすべての API がプロジェクトで指定されたデプロイメント ターゲットで使用できることを確認します。 利用できない API を使用しようとすると、Swift はコンパイル時にエラーを報告します。
You use an availability condition in an if or guard statement to conditionally execute a block of code, depending on whether the APIs you want to use are available at runtime. The compiler uses the information from the availability condition when it verifies that the APIs in that block of code are available.
if ステートメントまたは guard ステートメントで可用性条件を使用して、使用する API が実行時に利用可能かどうかに応じて条件付きでコード ブロックを実行します。 コンパイラは、そのコード ブロック内の API が利用可能であることを確認するときに、利用可能条件からの情報を使用します。
if #available(iOS 10, macOS 10.12, *) {
    // Use iOS 10 APIs on iOS, and use macOS 10.12 APIs on macOS
} else {
    // Fall back to earlier iOS and macOS APIs
}
The availability condition above specifies that in iOS, the body of the if statement executes only in iOS 10 and later; in macOS, only in macOS 10.12 and later. The last argument, *, is required and specifies that on any other platform, the body of the if executes on the minimum deployment target specified by your target.
上記の利用可能条件は、iOS では if ステートメントの本文が iOS 10 以降でのみ実行されることを指定しています。 macOS では、macOS 10.12 以降のみ。 最後の引数 * は必須で、他のプラットフォームでは、if の本体がターゲットで指定された最小のデプロイ ターゲットで実行されることを指定します。
In its general form, the availability condition takes a list of platform names and versions. You use platform names such as iOS, macOS, watchOS, and tvOS — for the full list, see Declaration Attributes. In addition to specifying major version numbers like iOS 8 or macOS 10.10, you can specify minor versions numbers like iOS 11.2.6 and macOS 10.13.3.
一般的な形式では、可用性条件はプラットフォーム名とバージョンのリストを受け取ります。 iOS、macOS、watchOS、tvOS などのプラットフォーム名を使用します。完全なリストについては、宣言の属性を参照してください。 iOS 8 や macOS 10.10 などのメジャー バージョン番号を指定するだけでなく、iOS 11.2.6 や macOS 10.13.3 などのマイナー バージョン番号を指定することもできます。
if #available(<#platform name#> <#version#>, <#...#>, *) {
    <#statements to execute if the APIs are available#>
} else {
    <#fallback statements to execute if the APIs are unavailable#>
}
When you use an availability condition with a guard statement, it refines the availability information that’s used for the rest of the code in that code block.
guard ステートメントで可用性条件を使用すると、そのコード ブロック内の残りのコードで使用される可用性情報が絞り込まれます。
@available(macOS 10.12, *)
struct ColorPreference {
    var bestColor = "blue"
}


func chooseBestColor() -> String {
    guard #available(macOS 10.12, *) else {
       return "gray"
    }
    let colors = ColorPreference()
    return colors.bestColor
}
In the example above, the ColorPreference structure requires macOS 10.12 or later. The chooseBestColor() function begins with an availability guard. If the platform version is too old to use ColorPreference, it falls back to behavior that’s always available. After the guard statement, you can use APIs that require macOS 10.12 or later.
上の例では、ColorPreference 構造には macOS 10.12 以降が必要です。 chooseBestColor() 関数は可用性保護で始まります。 プラットフォームのバージョンが古すぎて ColorPreference を使用できない場合は、常に利用可能な動作に戻ります。 guard ステートメントの後は、macOS 10.12 以降を必要とする API を使用できます。
In addition to #available, Swift also supports the opposite check using an unavailability condition. For example, the following two checks do the same thing:
#available に加えて、Swift は使用不可条件を使用した逆のチェックもサポートしています。 たとえば、次の 2 つのチェックは同じことを行います。
if #available(iOS 10, *) {
} else {
    // Fallback code
}


if #unavailable(iOS 10) {
    // Fallback code
}
Using the #unavailable form helps make your code more readable when the check contains only fallback code.
#unavailable フォームを使用すると、チェックにフォールバック コードのみが含まれている場合にコードが読みやすくなります。